This is the first article of a series of articles that I will dedicate to the JSF technology. In this series, I will implement a complete web application that shows how to integrate many frameworks: Primefaces, Prettyfaces, JasperReports, Freemarker, Hibernate etc...
But now we will begin by setting up a simple JSF2 project using Eclipse and Maven. Please notice that I suppose you already have Java 7, Eclipse Juno and Tomcat 7 installed on your machine.
Once you have all of these prepared, here are the steps to create a simple JSF 2, Maven enabled project:
1) Install the m2eclipse plugin, you can find the path to install site here. (You can also use the Eclipse Marketplace from the Help menu).
2) Once you finished the m2eclipse installation and restarted Eclipse, you can create new maven enabled projects: File->New->Other->Maven->Maven Project.
3) Next you need to specify the project location. I let it with default values:
4) Now you need to choose an Archetype for your project which is "in short, Archetype is a Maven project templating toolkit" (introduction to Archetypes here). You should select the "maven-archetype-webapp" entry:
5) Next you need to specify the Archetype parameters: Group Id and Artifact Id (here a link to maven naming conventions) and then press finish:
6) Once the project created, we need to add some facets to it. Right click the project. Choose Properties. Then select "Project Faces". By default there is no facets for this project, so you should select: "Convert to faceted form...":
7) Once converted, Eclipse show you a list of available facets. By default the Java facet should be selected. You need to verify the version to be used and select if not selected the 1.7 version. Also, select the Dynamic Web Module 3.0 facet, click Apply and then Ok:
8) After adding these facets, Eclipse will automatically add some elements to your projects, like the "Java Resources" part. Also there is a folder named WebContent that is created, you should delete it. 9) Now we need to add the Apache Tomcat 7 plugin to our project. So in the pom.xml file, ensure your build part looks like this:
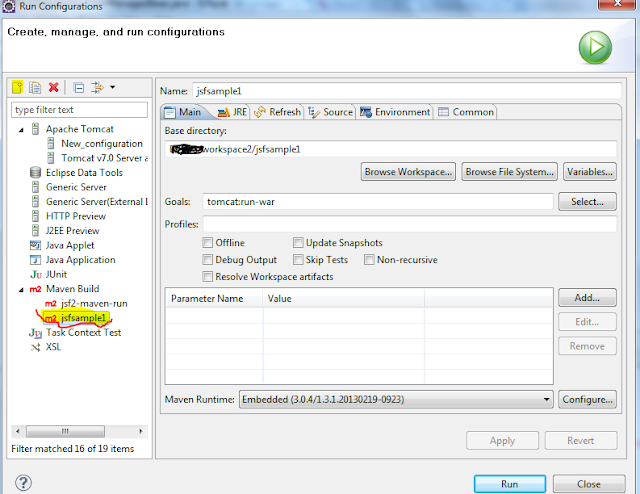
And now, just run it: Right click the project -> Run -> Run Configurations -> Right click Maven Build -> New. For the base directory, click Browse Workspace and select our project from the list. In the goals input, give: tomcat7:run and click Apply and Close. Please use tomcat7:run instead of tomcat7:run-war (shown in picture). The latter Goal will require restarting Tomcat even when changing xhtml files.
By now everything is prepared, we only need to add some code and maven config to add JSF2 dependencies.
Implementation
For this first article of the JSF series, we will implement two simple pages: one as a login page and the other as the user home page that will display user profile. 1) Add JSF Maven dependencies There are two dependencies to include in the pom.xml file (Project Object Model file under the project) for a JSF 2 application to run under Tomcat 7. We need also to configure the "maven-compiler-plugin" to use Java 7, so our pom.xml file should be like this:
Notice, that with every change in the pom.xml file, you need to right click the project -> Maven -> Update Project.
2) JSF implementation
Now that everything is in place, we should begin the implementation of our application. The first thing to do is to configure our deployment descriptor (web.xml file, under: src/main/webapp/WEB-INF). We need to declare the Faces Servlet (the servlet that will handle all user requests to jsf pages). So here is the result:
First JSF Samplejavax.faces.PROJECT_STAGEDevelopmentFaces Servletjavax.faces.webapp.FacesServletFaces Servlet*.jsfindex.jsp
Now, you add a faces-config.xml file, which will be just empty for now:
Now we can begin to implement our pages and Java classes. As we said previously, our first example will be a simple app that allows user login and profile display. So we need a User class that will represent a user. This is called a DTO: Data Transfer Object; it will handle data transferred between the layers of our application. We also need a ManagedBean in which we will define our actions that will be called from xhtml pages (The View in the MVC2 Design Pattern). ManagedBeans also will contain data to be displayed in the View.
So here is the User class:
package com.raissi.entities;

import java.io.Serializable;

public class User implements Serializable{

 private static final long serialVersionUID = 3571343460175211199L;

 private String login;
 private String password;
 private String firstName;
 private String lastName;

 public User(String login, String password, String firstName, String lastName) {
  super();
  this.login = login;
  this.password = password;
  this.firstName = firstName;
  this.lastName = lastName;
 }

 public String getLogin() {
  return login;
 }
 public void setLogin(String login) {
  this.login = login;
 }
 public String getPassword() {
  return password;
 }
 public void setPassword(String password) {
  this.password = password;
 }
 public String getFirstName() {
  return firstName;
 }
 public void setFirstName(String firstName) {
  this.firstName = firstName;
 }
 public String getLastName() {
  return lastName;
 }
 public void setLastName(String lastName) {
  this.lastName = lastName;
 }

}
You can see that it is a simple class to represent user entities. It will be used to transfer data between different layers (business, persistence, presentation) in Model part of the application. Remember that JSF is a MVC2 technology.
And here the UserManagedBean:
package com.raissi.managedbeans;

import java.io.Serializable;

import javax.faces.bean.ManagedBean;
import javax.faces.bean.SessionScoped;

import com.raissi.entities.User;

@ManagedBean(name="userManagedBean")
@SessionScoped
public class UserManagedBean implements Serializable{

 private static final long serialVersionUID = 152717293232892353L;
 private static final String HOME_PAGE="home?faces-redirect=true";
 private User user;
 private String userLogin;
 private String password;

 public String login(){
  if(userLogin != null && password != null){
   return someLoginMethod();
  }
  return "login?faces-redirect=true";
 }

 private String someLoginMethod(){
  if(userLogin.equals("tom") && password.equals("tom")){
   user = new User(userLogin, password, "Tom", "Hanks");
   return HOME_PAGE;
  }else if(userLogin.equals("forrest") && password.equals("forrest")){
   user = new User(userLogin, password, "Forrest", "Gump");
   return HOME_PAGE;
  }
  return "login?faces-redirect=true";
 }

 public User getUser() {
  return user;
 }

 public void setUser(User user) {
  this.user = user;
 }

 public String getUserLogin() {
  return userLogin;
 }

 public void setUserLogin(String userLogin) {
  this.userLogin = userLogin;
 }

 public String getPassword() {
  return password;
 }

 public void setPassword(String password) {
  this.password = password;
 }
}
The UserManagedBean contains two String properties (userLogin and password). They will be filled with user input in the login page. This class contains also a User property, it will be constructed based on what credentials are submitted when the login() method (action) is called. Basically, this method will make a call to a business class that will fetch user from a database or another persistent data via the DAO layer. For now, we just use an internal method that only accept two login values, tom and forrest.
With JSF 2 also, we can just specify the name of the view to which we want to redirect user as a return of our actions. No need to define our mappings in faces-config. Now we provide the xhtml pages that are responsible for the View part in our application. Notice that JSP technology is replaced with Facelets in JSF (especially JSF 2). The login.xhtml page:
<!DOCTYPE html PUBLIC "-//W3C//DTD XHTML 1.0 Transitional//EN"
"http://www.w3.org/TR/xhtml1/DTD/xhtml1-transitional.dtd">
<html
xmlns:f="http://java.sun.com/jsf/core"
xmlns:h="http://java.sun.com/jsf/html"
xmlns="http://www.w3.org/1999/xhtml">


        JSF Maven Eclipse integration


Please enter your credentials: tom/tom or forrest/forrest


</html>
In this page we define two inputs, one for the login and one for the password. We also define a button and the corresponding action to be called when it's pressed.
In the UserManagedBean#login() method we decided that user will be redirected to the home view if login is successful. For now, this page will just display a welcome message to the user, displaying his full name:
<!DOCTYPE html PUBLIC "-//W3C//DTD XHTML 1.0 Strict//EN" "http://www.w3.org/TR/xhtml1/DTD/xhtml1-strict.dtd">
<html
xmlns:f="http://java.sun.com/jsf/core"
xmlns:h="http://java.sun.com/jsf/html"
xmlns="http://www.w3.org/1999/xhtml">


        JSF Maven Eclipse integration - Your home page


     Welcome home dear


     Dear guest, you are not allowed to see this content


</html>
In the home page (home.xhtml), notice that we used the rendered attribute of panelGrid. This attribute is used to display (render) components based on particular conditions. These conditions here are whether the user property in UserManagedBean is empty or not. In other word, do we have a loggedin user or not. Finally, you should have noticed that in our web.xml descriptor we defined an index.jsp page as welcome file. This will be a simple page, that just redirect user to login page. Here is the index.jsp page to be placed under: src/main/webapp
<% response.sendRedirect("pages/login.jsf"); %>
Notice the .jsf extension used to call the login view. In fact, we declared the Faces Servlet (in web.xml) to handle only requests to .jsf views. If a user calls a page with .xhtml extension, then, JSF components won't be rendered. The final structure of our eclipse project is as in the picture:
If you want to load JS/CSS/Images with JSF components (as we did in login.xhtml page with the style.css file), then you should place those resources under: main/webapp/resources directory. Now you want to test the application. Right click the project -> Run As -> (Select the name you gave to the Run Configuration explained when adding the project to Tomcat 7: step 9 in configuration part). Finally, if you followed this tutorial literally you can call the login page via this URL: http://localhost:8080/jsfsample1/pages/login.jsf
Conclusion
In this introductory article, we saw how to create a JSF2 maven based project with Eclipse, and how to run it using a Run Configuration with Tomcat7.
In next part of this JSF series, we will integrate Primefaces and Prettyfaces libraries to our application.
In this first article, I will try to give a good solution to implement a progress bar with SWT. To achieve this, we will use the Observer Design Pattern.
1) Goal
Assume that we have a process which takes long time to finish (more than few seconds). Generally, we can't just leave the user with an ugly spinning cursor. So, the idea here is to show him some information that our program is running and may take sometime to finish. May be, with a simple output message. But this is really old. A good way would be to show him a progress bar indicating in what level is our process.
2) The Observer Design Pattern
This DP "defines a one-to-many dependency between objects so that when one object changes state, all its dependents are notified and updated automatically" (The GoF Design Patterns book).
The one object with changing state is called a subject the objects to be notified/updated are called observers.
In our case, we will have a class responsible for the execution of our process (let's say copying a list of files from one directory to another). On the other side, we have our graphical interface which contains buttons, messages and our progress bar. All of these will be grouped in one class (Window) for the simplicity of this article.
As you would have guessed, our business class (call it FileBusiness) is the subject and the window class (call it MainWindow) will contain observers for this subject.
Note that, if you have already used SWT, Swing or GWT, then you could have been using the Observer DP. In fact, observers are also called listeners and when using a Button (in SWT) you always use:
button.addSelectionListener(new SelectionListener() {
  public void widgetSelected(SelectionEvent event) {//some logic here}
  public void widgetDefaultSelected(SelectionEvent event) {//some logic here}
}
The above code registers a listener (an observer) to actions performed on the button object. If the button is clicked on the listener is notified and executes the defined logic.
For our example, we will implement almost the same concept. We will have a FileBusiness class (the subject) that has a method to register listeners to its changes, like the addSelectionListener method in the button example. Once a file is copied with success, the FileBusiness class will fire an event to notify all of its registered listener about it. One of these listeners will be an ActionListener defined in our MainWindow class.
Now, I think it's enough talking, and it would be good to go to coding.
3) The Subject class
package com.raissi.business;

import java.awt.event.ActionEvent;
import java.awt.event.ActionListener;
import java.io.IOException;
import java.nio.file.DirectoryStream;
import java.nio.file.Files;
import java.nio.file.Path;
import java.nio.file.Paths;
import java.nio.file.StandardCopyOption;
import java.util.ArrayList;
import java.util.List;

public class FileBusiness implements Runnable{

 private volatile boolean suspendCopy = false;

 private List listeners = new ArrayList();

 private String srcDirectory;
 private String destDirectory;
 private int countCopyingErrors;
 private int countCopied;
 private int countTotalFiles;

 @Override
 public void run() {
  if(!suspendCopy){
   doBusiness();
  }
 }

 private void doBusiness(){
  Path source = Paths.get(srcDirectory);
  if(!source.toFile().exists()){
   fireEvent("Could not find source directory: "+srcDirectory);
   return;
  }
  Path dest = Paths.get(destDirectory);
  if(!dest.toFile().exists()){
   try {
    Files.createDirectory(dest);
   } catch (IOException e) {
    fireEvent("Could not create destination folder, please check emplacement, permissions etc...");
    suspendCopy = true;
    return;
   }
  }
  DirectoryStream stream;
  try {
   stream = Files.newDirectoryStream(source);
  } catch (IOException e) {
   fireEvent("Could not read contents of directory: " + srcDirectory + " please check permissions");
   suspendCopy = true;
   return;
  }
  countTotalFiles = source.toFile().listFiles().length;
  fireEvent("Found: "+countTotalFiles+" files to copy");
  for (Path file : stream) {
   try {
    if(!suspendCopy){
     Files.copy(file, dest.resolve(file.getFileName()), StandardCopyOption.REPLACE_EXISTING);
     countCopied++;
     fireEvent("Copied file: "+file.getFileName());
    }
   } catch (IOException e) {
    countCopyingErrors++;
    fireEvent("Could not copy file: "+file.getFileName());
   }
  }
  if(!suspendCopy){
   fireEvent("Copying process finished!!!");
  }else{
   fireEvent("Copying process interrupted!!!");
  }
 }

 public void stopCopy(){
  suspendCopy = true;
 }

 public boolean copySuspended(){
  return suspendCopy;
 }

 public void addActionListener(ActionListener listener) {
  //As simple as say hello world, just add the listener to our list.
  //We don't need to know more about it, than that it implements the ActionListener interface.
  listeners.add(listener);
 }

 public void fireEvent(String message) {
  //We build an event, that will be sent to all registered listeners notifying them about changes
  ActionEvent event = new ActionEvent(this, ActionEvent.ACTION_PERFORMED, message);
  for(ActionListener listener: listeners){
   listener.actionPerformed(event);
  }
 }

 //Setters and getters:
 public int getCountCopyingErrors() {
  return countCopyingErrors;
 }

 public int getCountCopied() {
  return countCopied;
 }

 public int getCountTotalFiles() {
  return countTotalFiles;
 }

 public void setSrcDirectory(String srcDirectory) {
  this.srcDirectory = srcDirectory;
 }

 public void setDestDirectory(String destDirectory) {
  this.destDirectory = destDirectory;
 }


}
We are using thread (Runnable interface) so the the graphical interface does not crash (stop working) until the called business method returns.
4) The Observer part
Now let's see the MainWindow class:
package com.raissi.ui;

import java.awt.event.ActionEvent;
import java.awt.event.ActionListener;

import org.eclipse.swt.SWT;
import org.eclipse.swt.events.SelectionAdapter;
import org.eclipse.swt.events.SelectionEvent;
import org.eclipse.swt.events.SelectionListener;
import org.eclipse.swt.widgets.Button;
import org.eclipse.swt.widgets.DirectoryDialog;
import org.eclipse.swt.widgets.Display;
import org.eclipse.swt.widgets.Label;
import org.eclipse.swt.widgets.ProgressBar;
import org.eclipse.swt.widgets.Shell;
import org.eclipse.swt.widgets.Text;

import com.raissi.business.FileBusiness;

public class MainWindow {

 /**
  * Business components
  */
 private FileBusiness fileBusiness;
 private Thread thread;
 /**
  * UI components
  */
 protected final Shell dialog = new Shell();

 /**
  * Launch the application.
  * @param args
  */
 public static void main(String[] args) {
  try {
   MainWindow window = new MainWindow();
   window.open();
  } catch (Exception e) {
   e.printStackTrace();
  }
 }

 /**
  * Open the window.
  */
 public void open() {
  Display display = Display.getDefault();
  createContents();
  dialog.open();
  dialog.layout();
  while (!dialog.isDisposed()) {
   if (!display.readAndDispatch()) {
    display.sleep();
   }
  }
 }

 /**
  * Create contents of the window.
  */
 protected void createContents() {
  dialog.setSize(610, 549);
  dialog.setText("Compression");

  final Label txtSampleText = new Label(dialog, SWT.BORDER);
  txtSampleText.setAlignment(SWT.CENTER);
  txtSampleText.setText("Compression non démarrée");
  txtSampleText.setBounds(220, 95, 331, 20);

  final Text srcDirectory = new Text(dialog, SWT.BORDER);
  srcDirectory.setBounds(220, 25, 196, 20);

  Label lblSrcDirectory = new Label(dialog, SWT.NONE);
  lblSrcDirectory.setBounds(97, 25, 120, 20);
  lblSrcDirectory.setText("Source directory*:");


  Button btnSrcDirectory = new Button(dialog, SWT.NONE);
  btnSrcDirectory.setBounds(420, 25, 91, 20);
  btnSrcDirectory.setText("Parcourir...");
  btnSrcDirectory.addSelectionListener(new SelectionAdapter() {
   public void widgetSelected(SelectionEvent event) {
    DirectoryDialog directoryDialog = new DirectoryDialog(dialog);
    directoryDialog.setMessage("Select source directory");
    String folderName = directoryDialog.open();
    if (folderName != null) {
     srcDirectory.setText(folderName);
    }
   }
  });

  Label lblDestDirectory = new Label(dialog, SWT.NONE);
  lblDestDirectory.setBounds(97, 55, 120, 20);
  lblDestDirectory.setText("Dest. directory*:");

  final Text destDirectory = new Text(dialog, SWT.BORDER);
  destDirectory.setBounds(220, 55, 196, 20);

  Button btnDestDirectory = new Button(dialog, SWT.NONE);
  btnDestDirectory.setBounds(420, 55, 91, 20);
  btnDestDirectory.setText("Parcourir...");
  btnDestDirectory.addSelectionListener(new SelectionAdapter() {
   public void widgetSelected(SelectionEvent event) {
    DirectoryDialog directoryDialog = new DirectoryDialog(dialog);
    directoryDialog.setMessage("Select destination directory");
    String folderName = directoryDialog.open();
    if (folderName != null) {
     destDirectory.setText(folderName);
    }
   }
  });

  final ProgressBar progressBar = new ProgressBar(dialog, SWT.SMOOTH);
  progressBar.setBounds(97, 125, 454, 25);
  progressBar.setMaximum(100);
  progressBar.setSelection(0);

  Label lblTotalCopied = new Label(dialog, SWT.NONE);
  lblTotalCopied.setBounds(97, 320, 150, 20);
  lblTotalCopied.setText("Total copied");

  Label lblErrors = new Label(dialog, SWT.NONE);
  lblErrors.setBounds(97, 350, 138, 20);
  lblErrors.setText("Errors");

  Label lblTotalFiles = new Label(dialog, SWT.NONE);
  lblTotalFiles.setBounds(97, 380, 138, 20);
  lblTotalFiles.setText("Total documents");

  final Label varTotalCopied = new Label(dialog, SWT.NONE);
  varTotalCopied.setBounds(319, 320, 70, 20);
  varTotalCopied.setText("0");

  final Label varErros = new Label(dialog, SWT.NONE);
  varErros.setBounds(319, 350, 70, 20);
  varErros.setText("0");

  final Label varTotalFiles = new Label(dialog, SWT.NONE);
  varTotalFiles.setBounds(319, 380, 70, 20);
  varTotalFiles.setText("0");


  final Button btnStartCopy = new Button(dialog, SWT.NONE);
  btnStartCopy.setBounds(97, 95, 91, 20);
  btnStartCopy.setToolTipText("Start copy process");
  btnStartCopy.setText("Start");
  final Button btnStopCopy = new Button(dialog, SWT.NONE);
  btnStopCopy.setBounds(97, 95, 91, 20);
  btnStopCopy.setText("Stop");
  btnStopCopy.setVisible(false);

  final Text logText = new Text(dialog, SWT.MULTI|SWT.BORDER|SWT.WRAP|SWT.READ_ONLY|SWT.V_SCROLL);
  logText.setBounds(94, 160, 454, 150);

  /**
   * Button events definitions
   */

  btnStartCopy.addSelectionListener(new SelectionListener() {

        public void widgetSelected(SelectionEvent event) {
         btnStartCopy.setVisible(false);
         btnStopCopy.setVisible(true);
         logText.clearSelection();
         logText.append("Starting\n");
         fileBusiness = new FileBusiness();
         fileBusiness.setSrcDirectory(srcDirectory.getText());
         fileBusiness.setDestDirectory(destDirectory.getText());
         fileBusiness.addActionListener(new ActionListener() {
     @Override
     public void actionPerformed(final ActionEvent event) {
      Display.getDefault().asyncExec(new Runnable() {
                      public void run() {
                      int total = fileBusiness.getCountTotalFiles();
                      if(total != 0){
                       int percent = fileBusiness.getCountCopied()*100 / total;
                 progressBar.setSelection(percent);
                 varTotalCopied.setText(""+fileBusiness.getCountCopied());
                 varErros.setText(""+fileBusiness.getCountCopyingErrors());
                 varTotalFiles.setText(""+total);
                      }
                logText.append(event.getActionCommand()+"\n");
                if(!fileBusiness.copySuspended()){
                 txtSampleText.setText("Process executing");
                }else{
                 txtSampleText.setText("Process interrupted");
                }
                      }
              });
     }
    });
         thread = new Thread(fileBusiness);
         thread.start();
        }

        public void widgetDefaultSelected(SelectionEvent event) {
         widgetSelected(event);
        }
   });


  btnStopCopy.addSelectionListener(new SelectionListener() {

        public void widgetSelected(SelectionEvent event) {
    txtSampleText.setText("Process stopped");
    btnStartCopy.setVisible(true);
    btnStopCopy.setVisible(false);
    fileBusiness.stopCopy();
    try {
     thread.join();
    } catch (InterruptedException e) {
     e.printStackTrace();
    }
        }

        public void widgetDefaultSelected(SelectionEvent event) {
         widgetSelected(event);
        }
      });


 }
}
Please notice:
When registering the listener on the subject object, I used: Display.getDefault().asyncExec(new Runnable().... If you omit it, you will get org.eclipse.swt.SWTException: Invalid thread access
I used in the FileBusiness class the suspendCopyvolatile property, so I can manage the thread execution through UI buttons. Especially when a user press Stop during process execution. In this case, if there is a file being copied, it will copied, and then the process execution will be interrupted.
Conclusion
In this first article, we saw haw to use the Observer Design Pattern to implement a progress bar with SWT. We also used Java 7 new features regarding files operations.
In a next article, I will enhance the business process, with the Spring Batch framework. It's a very powerful framework to execute such batch jobs, especially when number of iterations is large and the operation itself can take longtime.
We will also, see how to execute SSH commands on distant machines through Java regardless of OS Type.
Last thing to say, please feel free to copy or comment this content.