In this article we will create a basic maven Spring application. The application will contain following features:



Now open the pom.xml file and change it so it looks like the following:
You need now to run (right click on the project) Maven->Update Project...
Now the project should be ready to add some code to it.
Now let's create the applicationContext.xml file to configure Spring:
Under src/main/webapp/WEB-INF add a file named applicationContext.xml:
 Next, open the file and add the following:
For now, the file contains only the base package to tell Spring where to find our beans. And also the context:annotation-config to tell Spring that we are using annotations to define our resources.
As the documentation says, the "property-placeholder" entry "Activates replacement of ${...} placeholders by registering a PropertySourcesPlaceholderConfigurer within the
application context". For example, if you want to define a dataSource to access the DB and have its parameters like jdbcUrl been defined in the properties file, you just write the following:
e.g: db.username=raissi.
And that's it!! Very simple, but very useful. By now, depending on your environment type, Spring will load the appropriate properties file.
You may also have noticed, that in Spring dependencies I excluded commons-logging. In fact, Spring uses by default Commons Logging for their logs. And to make it use Logback, you must exclude commons-logging like I did for Spring dependencies.
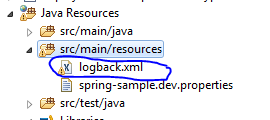
Now, let's configure Logback. It's very simple, all you need is to add (like log4j) an XML file called logback.xml to your application classpath:
P.S: If you were using Log4j and you want just to convert your log4j.properties file automatically, there is an online tool for this.
Before configuring our loggings, let's explain what we want to do:
- Depending on an environment variable (call it env), the application will specific parameters, e.g: DB URL, schemas, and so on.
- The application must write some custom log messages to a particular log file. Let's say that this file will contain specific log messages to be visualised by admin
- The application will use Ehcache to cache calls to specific methods
1. Create the project with maven
First, let's create a maven web project. To do so, go to project placement (where you want to create the project) and run following command (you must have maven installed, see the link for instructions):
mvn archetype:generate -DarchetypeArtifactId=maven-ar
It will ask you to enter the groupId, the artifactId, the version and the package for the newly generated project.
After that, go to Eclipse (or your favorite IDE) and import the project. In Eclipse, right click in the project explorer and chose Import -> Import... After that, a dialog will be opened:
Chose "Existing Maven Projects" and click Next>.
Now browse to where you executed the mvn command and select the newly created (by maven) project having for name the value of artifact that you gave:
And click Finish.
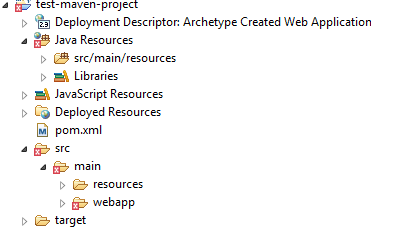
You will see the newly imported project under your projects explorer in Eclipse:
Now right click on src/main folder and chose New->Folder and name it "java"
After that, right click on src folder and chose New->Folder and name it "test". And add another folder named "java" under the newly created "test" folder. Now you project should look like this:
Now open the pom.xml file and change it so it looks like the following:
<project xmlns="http://maven.apache.org/POM/4.0.0" xmlns:xsi="http://www.w3.org/2001/XMLSchema-instance"
  xsi:schemaLocation="http://maven.apache.org/POM/4.0.0 http://maven.apache.org/maven-v4_0_0.xsd">
  <modelVersion>4.0.0</modelVersion>
  <groupId>com.raissi</groupId>
  <artifactId>test-maven-project</artifactId>
  <packaging>war</packaging>
  <version>1.0-SNAPSHOT</version>
  <name>test-maven-project Maven Webapp</name>
  <url>http://maven.apache.org</url>
  <dependencies>
   <!-- Just for tests -->
 <dependency>
  <groupId>javax.servlet</groupId>
  <artifactId>javax.servlet-api</artifactId>
  <version>3.0.1</version>
  <scope>test</scope>
 </dependency>
    <dependency>
      <groupId>junit</groupId>
      <artifactId>junit</artifactId>
      <version>4.11</version>
      <scope>test</scope>
    </dependency>
  </dependencies>
  <properties>
  <spring.version>4.0.4.RELEASE</spring.version>
  <project.build.sourceEncoding>UTF-8</project.build.sourceEncoding>
  </properties>
  <build>
  <finalName>spring-cache-tutorial</finalName>
  <plugins>
   <plugin>
    <groupId>org.apache.maven.plugins</groupId>
    <artifactId>maven-compiler-plugin</artifactId>
    <version>3.1</version>
    <configuration>
     <source>1.7</source>
     <target>1.7</target>
     <encoding>${project.build.sourceEncoding}</encoding>
    </configuration>
   </plugin>
   <plugin>
    <groupId>org.apache.maven.plugins</groupId>
    <artifactId>maven-war-plugin</artifactId>
    <version>2.4</version>
    <configuration>
     <archive>
      <manifestEntries>
       <DisableIBMJAXWSEngine>true</DisableIBMJAXWSEngine>
      </manifestEntries>
     </archive>
    </configuration>
   </plugin>

  </plugins>
 </build>
</project>
Now the project should be ready to add some code to it.
2. Prepare the Spring application
As said in the introduction, this is a Spring application, so first we need to add the Spring dependenciies to our project. In pom.xml file, add following:
<dependency>
   <groupId>org.springframework</groupId>
   <artifactId>spring-core</artifactId>
   <version>${spring.version}</version>
   <exclusions>
    <exclusion>
     <groupId>commons-logging</groupId>
     <artifactId>commons-logging</artifactId>
    </exclusion>
   </exclusions>
  </dependency>
  <dependency>
   <groupId>org.springframework</groupId>
   <artifactId>spring-beans</artifactId>
   <version>${spring.version}</version>
  </dependency>
  <dependency>
   <groupId>org.springframework</groupId>
   <artifactId>spring-aop</artifactId>
   <version>${spring.version}</version>
  </dependency>
  <dependency>
   <groupId>org.springframework</groupId>
   <artifactId>spring-context</artifactId>
   <version>${spring.version}</version>
   <exclusions>
    <exclusion>
     <groupId>commons-logging</groupId>
     <artifactId>commons-logging</artifactId>
    </exclusion>
   </exclusions>
  </dependency>
  <!-- Various Application Context utilities, including EhCache, JavaMail,
   Quartz, and Freemarker integration Define this if you need any of these integrations -->
  <dependency>
   <groupId>org.springframework</groupId>
   <artifactId>spring-context-support</artifactId>
   <version>${spring.version}</version>
  </dependency>
  <dependency>
   <groupId>org.springframework</groupId>
   <artifactId>spring-tx</artifactId>
   <version>${spring.version}</version>
  </dependency>
  <dependency>
   <groupId>org.springframework</groupId>
   <artifactId>spring-jdbc</artifactId>
   <version>${spring.version}</version>
  </dependency>
  <dependency>
   <groupId>org.springframework</groupId>
   <artifactId>spring-web</artifactId>
   <version>${spring.version}</version>
  </dependency>

  <dependency>
   <groupId>org.aspectj</groupId>
   <artifactId>aspectjweaver</artifactId>
   <version>1.7.4</version>
  </dependency>
  <dependency>
   <groupId>org.aspectj</groupId>
   <artifactId>aspectjrt</artifactId>
   <version>1.7.4</version>
  </dependency>
  <!-- JSR 330 -->
  <dependency>
   <groupId>javax.inject</groupId>
   <artifactId>javax.inject</artifactId>
   <version>1</version>
  </dependency>
<beans xmlns="http://www.springframework.org/schema/beans"
 xmlns:xsi="http://www.w3.org/2001/XMLSchema-instance" xmlns:aop="http://www.springframework.org/schema/aop"
 xmlns:context="http://www.springframework.org/schema/context" xmlns:p="http://www.springframework.org/schema/p"
 xmlns:tx="http://www.springframework.org/schema/tx" xmlns:task="http://www.springframework.org/schema/task"
 xmlns:cache="http://www.springframework.org/schema/cache"
 xsi:schemaLocation="http://www.springframework.org/schema/beans
 http://www.springframework.org/schema/beans/spring-beans-4.0.xsd
 http://www.springframework.org/schema/context
 http://www.springframework.org/schema/context/spring-context-4.0.xsd
 http://www.springframework.org/schema/tx
    http://www.springframework.org/schema/tx/spring-tx-4.0.xsd
    http://www.springframework.org/schema/aop
    http://www.springframework.org/schema/aop/spring-aop-4.0.xsd
    http://www.springframework.org/schema/task
    http://www.springframework.org/schema/task/spring-task-4.0.xsd
    http://www.springframework.org/schema/cache
    http://www.springframework.org/schema/cache/spring-cache-4.0.xsd">

 <!-- Base package for Spring to look for annotated beans -->
 <context:component-scan base-package="com.raissi" />
 <!-- Activates various annotations to be detected in bean classes: Spring's @Required and @Autowired, as well as JSR
    250's @PostConstruct, @PreDestroy and @Resource (if available) etc...-->
 <context:annotation-config></context:annotation-config>

</beans>
For now, the file contains only the base package to tell Spring where to find our beans. And also the context:annotation-config to tell Spring that we are using annotations to define our resources.
3. Properties file
By now, we have Spring correctly configured. So let's move to the first requirement of our application.
The goal here is to have multiple properties files, and that our application uses the right one for every environment.
Let's say you have different servers on different machines, one of these servers is dedicated to DEV teams, another is for TEST teams, and another one is for PRODUCTION. And that you are using Jenkins or another Continuous Integration tool to build and deploy your application.
Evidently, the 3 environments have different values for config parameters like DB URL, username and password etc...
To not be obliged to change these values manually in your properties files, or using maven to change them, we will create three properties files, each one is dedicated to a specific environment:
spring-sample.dev.properties, spring-sample.test.properties and spring-sample.prod.properties. Please notice that the only difference in their names is the words "dev", "test" and "prod" after "spring-sample".
The idea is to tell Spring to load the appropriate file based on an environment variable that we will call "env".
In a PRODUCTION server, the value "env" must be equal to "prod" so our application loads the spring-sample.prod.properties file. Same thing for DEV and TEST environments.
So you must create a new environment variable in your system having "env" as a name, and either "dev", "test" or "prod" as value. You can change the value later to check that the right file is being loaded.
After creating the variable, you must shutdown Eclipse and start it again so that it can be aware of the newly created variable. Notice, that if you click on "Restart" eclipse, the JVM does not exit, and by that the new variable is not discovered.
After that, let's edit the applicationContext.xml file to add following entry:
<!-- application.properties will contain all our config data: db username,
  password, etc... -->
 <context:property-placeholder
  location="classpath:spring-sample.${env}.properties"/>
application context". For example, if you want to define a dataSource to access the DB and have its parameters like jdbcUrl been defined in the properties file, you just write the following:
<bean id="dataSource" class="com.mchange.v2.c3p0.ComboPooledDataSource"  destroy-method="close">
 <property name="driverClass" value="${db.className}" />
 <property name="jdbcUrl" value="${db.url}" />
 <property name="user" value="${db.username}" />
 <property name="password" value="${db.password}" />
</bean>
And then in your spring-sample.dev.properties file (we suppose your "env" variable value is equal to "dev"), define values for db.className, db.url etc...e.g: db.username=raissi.
And that's it!! Very simple, but very useful. By now, depending on your environment type, Spring will load the appropriate properties file.
4. Add Logback
Logback is a logging library for Java. It "is intended as a successor to the popular log4j project". Written by the same author of log4j, Logback offers a faster implementation, "Logback is intended as a successor to the popular log4j project". More reasons why you should use Logback can be found here.
To use Logback, you need firstly to add its dependencies to your pom.xml:
<!-- SLF4J -->
  <dependency>
   <groupId>org.slf4j</groupId>
   <artifactId>slf4j-api</artifactId>
   <version>1.7.5</version>
  </dependency>

  <dependency>
   <groupId>org.slf4j</groupId>
   <artifactId>jcl-over-slf4j</artifactId>
   <version>1.7.5</version>
  </dependency>

  <!-- Log Back -->
  <dependency>
   <groupId>ch.qos.logback</groupId>
   <artifactId>logback-classic</artifactId>
   <version>1.1.1</version>
  </dependency>
  <dependency>
   <groupId>ch.qos.logback</groupId>
   <artifactId>logback-core</artifactId>
   <version>1.1.1</version>
  </dependency>
Now, let's configure Logback. It's very simple, all you need is to add (like log4j) an XML file called logback.xml to your application classpath:
Before configuring our loggings, let's explain what we want to do:
- The console must display all logs (depending on our global log level)
- There must be a log file for every level, one for debug, one for error and one for info messages
- There must be some particular messages (of any level) that must be written to a special file. Let's say they are special messages intended for admins of the application.
- When reaching a particular size, the log file is compressed in a zip archive.
<appender name="STDOUT" class="ch.qos.logback.core.ConsoleAppender">
  <encoder>
   <pattern>%d{[yyyy-MM-dd] HH:mm:ss.SSS} %-5level %logger{36} - %msg%n</pattern>
  </encoder>
 </appender>
This does not do so much. Let's now define an appender that writes info messages to a specific file:<!-- We use a RollingFileAppender to backup the log files depending in the previously mentioned ZIP archives -->
<appender name="FILE-INFO"
class="ch.qos.logback.core.rolling.RollingFileAppender">
<!-- The file location -->
<file>${log.basefolder}/${log.info.filename}</file>
<!-- The rolling policy how to rollover files
Here I am chosing to to keep up to 3 zip archives, and then delete the oldest one
-->
<rollingPolicy class="ch.qos.logback.core.rolling.FixedWindowRollingPolicy">
<fileNamePattern>${log.rolling.folder}/sample-info.%i.log.zip</fileNamePattern>
<minIndex>1</minIndex>
<maxIndex>3</maxIndex>
</rollingPolicy>
<!-- The trigger to rollover a file, here I'm using a size based trigger. When file is up to maxFileSize, a rollover takes place -->
<triggeringPolicy
class="ch.qos.logback.core.rolling.SizeBasedTriggeringPolicy">
<maxFileSize>${log.file.maxSize}</maxFileSize>
</triggeringPolicy>
<!-- The pattern for our messages, just like Log4j -->
<encoder>
<pattern>%d{[yyyy-MM-dd] HH:mm:ss.SSS} %-5level %logger{36} - %msg%n</pattern>
</encoder>
<!-- The level filter, accept only INFO messages in this appender -->
<filter class="ch.qos.logback.classic.filter.LevelFilter">
<level>INFO</level>
<onMatch>ACCEPT</onMatch>
<onMismatch>DENY</onMismatch>
</filter>
</appender>
You can see in the comments inside the code that we are using an Appender to accept only INFO messages, and to write them to a specific file. We are also using a Rollover policy to backup files into up to 3 zip archives, and then when max size exceeded, delete the oldest one and continue.One other thing to notice, is the use of placeholders like: ${log.info.filename}.
To be able to use such placeholders, you neeed to add a property to specify from where to load these placeholder values:
<property resource="spring-sample.${env}.properties" />
And here we are referring to our environment dependent resource file, previously used with Spring. The nice thing here, is that Logback recognizes environment variables, just like Spring does.Here is an example of my spring-sample.dev.properties file:
log.basefolder=path-to-a-folder-that-will-contain-our-log-files
log.info.filename=sample-info.log
log.debug.filename=sample-debug.log
log.error.filename=sample-error.log
log.audit.filename=sample-audit.log

#Max size for a log file
log.file.maxSize=5MB
#folder to save in log files when the log size exceeds maxSize
log.rolling.folder=path-to-a-folder-that-will-contain-our-log-files-archives
Same thing should be done for debug and error levels.
Another thing we need with our logs, is to have a custom file for admin messages. To do so, we need to use another filter for our appender other than the LevelFilter previously used with INFO messages.
this time, we will use an EvaluatorFilter that use Markers to decide of the type of messages:
<appender name="AUDIT_FILE" class="ch.qos.logback.core.FileAppender">
  <!-- the filter element -->
  <filter class="ch.qos.logback.core.filter.EvaluatorFilter">
   <evaluator class="ch.qos.logback.classic.boolex.OnMarkerEvaluator">
    <!-- you can use any other value, just make sure, you use the same value in your Java code -->
    <marker>AUDIT_SYS</marker>
   </evaluator>
   <onMismatch>DENY</onMismatch>
   <onMatch>ACCEPT</onMatch>
  </filter>

  <file>${log.basefolder}/${log.audit.filename}</file>
  <encoder>
   <pattern>%d{[yyyy-MM-dd] HH:mm:ss.SSS} %level %logger{36} - %msg %n</pattern>
  </encoder>

  <rollingPolicy class="ch.qos.logback.core.rolling.FixedWindowRollingPolicy">
   <fileNamePattern>${log.rolling.folder}/sample-audit.%i.log.zip</fileNamePattern>
   <minIndex>1</minIndex>
   <maxIndex>3</maxIndex>
  </rollingPolicy>

  <triggeringPolicy
   class="ch.qos.logback.core.rolling.SizeBasedTriggeringPolicy">
   <maxFileSize>${log.file.maxSize}</maxFileSize>
  </triggeringPolicy>
 </appender>
Here the only that changed (compared to previous appender for INFO messages) is the Filter part.The last thing to do, is tell Logback to use our defined appenders, and also to specify the global log level for our application:
 <!-- Levels by packages and classes: -->
 <!-- you can define as many as you want loggers. just like in Log4j,
 and this may be also by class or by package -->
    <logger name="com.sample.services" level="debug"/>
    <logger name="org.springframework.jdbc.core" level="TRACE">
    <appender-ref ref="STDOUT" />
    </logger>
 <logger name="com.sample.Foo" level="info"/>

 <root level="debug">
  <appender-ref ref="STDOUT" />
  <appender-ref ref="FILE-INFO" />
  <appender-ref ref="FILE-DEBUG" />
  <appender-ref ref="FILE-ERROR" />
  <appender-ref ref="AUDIT_FILE" />
 </root>
package com.raissi;

import org.junit.Test;
import org.slf4j.Logger;
import org.slf4j.LoggerFactory;
import org.slf4j.Marker;
import org.slf4j.MarkerFactory;

public class LogbackDemoClass {

    private static final Logger LOGGER = LoggerFactory.getLogger(LogbackDemoClass.class);
    private static final Marker CACHE_LOG = MarkerFactory.getMarker("AUDIT_SYS");

    @Test
    public void testLogs(){
        LOGGER.debug("This message will go to debug file only, and will contain a param: {}", "paramValue");
        LOGGER.debug(CACHE_LOG, "This message will go to debug file and admin log file also, and will contain a param: {}", "paramToAdmin");
    }
}
Few thing are to note here:
- We use the same value to build the Marker object as the one defined in logback.xml file
- No need to test if debug is enabled like we should do in other logging libraries
- We use placeholders to introduce parameters, so that the complete String message is only built if the message is really going to be printed
5. Caching with Ehcache
The last part of this article, is to configure Ehcache to be used with our Spring application. It's mainly used to cache expensive calls that have results which change rarely, or at known rate.
If you google for "Ehcache with Spring example", you will find so many tutorials about this subject. So why am I writing about it again ? It's to address a point rarely considered on these tutorials.
So let's begin by configuring Ehcache for our application.
First thing to do, is to add Ehcache dependecies to you pom.xml file:
  <!-- Ehcache -->
  <dependency>
   <groupId>net.sf.ehcache</groupId>
   <artifactId>ehcache</artifactId>
   <version>2.7.4</version>
  </dependency>
Next you need to configure Spring to use Ehcache for our caching. In fact, Spring can be configured to use multiple cache implementations. See the docs for more details.
So, in applicationContext.xml file, add the following:
<!-- Tell Spring that we going to use cache annotations in our Java code -->
 <cache:annotation-driven/>
 <bean id="cacheManager" class="org.springframework.cache.ehcache.EhCacheCacheManager"
  p:cache-manager-ref="ehcache" />
 <!-- EhCache library setup -->
 <bean id="ehcache"
  class="org.springframework.cache.ehcache.EhCacheManagerFactoryBean"
  p:config-location="classpath:ehcache.xml" />
Here we are referring to a file named "ehcache.xml", it's there where to configure Ehcache, about how to define our cache. see this page for details about what you should define there.
Here is my ehcache.xml file:
<?xml version="1.0" encoding="UTF-8"?>
<ehcache xmlns:xsi="http://www.w3.org/2001/XMLSchema-instance"
 xsi:noNamespaceSchemaLocation="http://ehcache.org/ehcache.xsd">
 <defaultCache eternal="false" maxElementsInMemory="100"
  overflowToDisk="false" />
 <cache name="spring-cache" maxElementsInMemory="1000000" eternal="false"
  overflowToDisk="false" />
</ehcache>
Main things to notice here are the cache named "spring-cache", we will refer to it in our cache annotations later. There also the maxElementsInMemory property that defines to max elements to be contained in this cache. You can define more than one cache.
Now in your Spring beans, you just add annotations to cache method calls, or to evict elements from cache:
Here is a simple example of a service class:
package com.raissi;

import java.util.ArrayList;
import java.util.Arrays;
import java.util.List;

import org.slf4j.Logger;
import org.slf4j.LoggerFactory;
import org.slf4j.Marker;
import org.slf4j.MarkerFactory;
import org.springframework.cache.annotation.CacheEvict;
import org.springframework.cache.annotation.Cacheable;
import org.springframework.stereotype.Service;

@Service
public class PersonServiceImpl implements PersonService{

 private static final Logger LOGGER = LoggerFactory.getLogger(PersonServiceImpl.class);
 private static final Marker CACHE_LOG = MarkerFactory.getMarker("AUDIT_SYS");

 private List<String> units = new ArrayList<>(Arrays.asList("UNIT01", "UNIT02", "UNIT03"));
 private List<String> persons = new ArrayList<>(Arrays.asList("PERSON01", "PERSON02", "PERSON03"));


 @Override
 @Cacheable(value = "spring-cache")
 public List<String> getPersonNames(String department){
  LOGGER.info(CACHE_LOG, "Getting Person names of department {}", department);
  return new ArrayList<>(persons);
 }

 @Override
 @Cacheable(value = "spring-cache")
 public List<String> getDepartmentUnitNames(String department) {
  LOGGER.info(CACHE_LOG, "Getting unit names of department {}", department);
  return units;
 }

 @Override
 @CacheEvict(value = { "spring-cache" }, key="#root.targetClass.getName() + 'getPersonNames' + #department")
 public void savePersonInDepartment(String person, String department){
  persons.add(person);
 }

 @Override
 public void savePersonInDepartmentNoEvict(String person, String department){
  persons.add(person);
 }
}
Just very simple. whenever we want to cache a method call, we annotate it with Cacheable, giving the cache name as value.The only point that may be a little tricky here is the CacheEvict annotation. This is used, to evict an entry from the cache. Let me explain.
In the case of the getPersonNames(String department) method, we are caching its results, for example, when first time, you call getPersonNames("DEPT01") the call is going to invoke the method implementation returning list of persons in department "DEPT01".
Next time the method is called, the result is fetched from the cache, which means, the method implementation won't be invoked.
Now, what if we want to add a new person to this department. In this situation, we have to evict the entry associated with the DEPT01 from the cache. This is done by annotating the method that modifies the content of DEPT01 with CacheEvict. We need to give the annotation the key of the entry to be deleted from the cache. Which gets us to the main point of the part of the article. The cache keys.
Default cache key generator in Spring
When caching a method call (which is similar to putting an object in a map), Spring generates a key for it so it can be got next time a call made to that method. For this, Spring offers a default key generation mechanism. This is done via DefaultKeyGenerator in Spring versions prior to Spring 4. In Spring 4, the default key generator is SimpleKeyGenerator.
If you look at the code of key generation :
@Override
 public Object generate(Object target, Method method, Object... params) {
  if (params.length == 0) {
   return SimpleKey.EMPTY;
  }
  if (params.length == 1) {
   Object param = params[0];
   if (param != null && !param.getClass().isArray()) {
    return param;
   }
  }
  return new SimpleKey(params);
 }
You can refer to this Jira issue to see a discussion about it.
So, by default, both our cached methods getPersonNames and getDepartmentUnitNames would return same values on their second calls with the same "DEPT01" value as parameters.
And this would be really catastrophic if not considered.
So what to do ?
First solution, would be to add a key to every Cacheable annotation like this:
@Cacheable(value="atlas", key="#root.targetClass + #root.methodName + #department")This will add the class name and the method name to the generated key. And this really solves the problem.
Custom key generator
Using the mentioned solution to give special key to every method, solves the problem, but this would be a tedious task to add a key to every Cacheable annotation, and it would be a bug generator, in case one forgets to include a parameter in the key.
A better solution for this would be to tell Spring to use our custom key generator instead of the SimpleKeyGenerator.
For this, we need to add a new class implementing the KeyGenerator interface:
package com.raissi.spring.cache;

import java.lang.reflect.Method;

import org.springframework.cache.interceptor.KeyGenerator;

public class CacheKeyGenerator implements KeyGenerator {

 @Override
 public Object generate(final Object target, final Method method,
   final Object... params) {
  StringBuilder key = new StringBuilder(method.getDeclaringClass().getName()).append(method.getName());
  if(params != null){
   for(Object obj: params){
    key.append(obj.toString());
   }
  }
  return key.toString();
 }
}
In applicationContext.xml;
<!-- Change it to reference our KeyGenerator class -->
<cache:annotation-driven key-generator="cacheKeyGenerator" />
<bean id="cacheKeyGenerator" class="com.raissi.spring.cache.CacheKeyGenerator" />
Notice that I changed the cache:annotation-driven to include a key-generator attribute.
And that's it!
6. Testing your Spring applications with JUnit
The final part of this article is to show you how to test your beans with JUnit and Spring-test.
First add following dependencies:
<!-- Tests -->
  <dependency>
   <groupId>org.springframework</groupId>
   <artifactId>spring-test</artifactId>
   <version>${spring.version}</version>
  </dependency>
  <!-- JUnit -->
  <dependency>
   <groupId>junit</groupId>
   <artifactId>junit</artifactId>
   <version>4.11</version>
   <scope>test</scope>
  </dependency>

  <!-- Mockito -->
  <dependency>
   <groupId>org.mockito</groupId>
   <artifactId>mockito-core</artifactId>
   <version>1.9.5</version>
   <scope>test</scope>
  </dependency>

There we will create a base class: AbstractContextTests, all other test classes will extend it. This class will define context config location of Spring, it ensures that a
WebApplicationContext will be loaded for the test:package com.raissi.spring.test;
import org.springframework.beans.factory.annotation.Autowired;
import org.springframework.test.context.ContextConfiguration;
import org.springframework.test.context.web.WebAppConfiguration;
import org.springframework.web.context.WebApplicationContext;
@WebAppConfiguration
@ContextConfiguration(value={"file:src/main/webapp/WEB-INF/applicationContext.xml"})
public class AbstractContextTests {
@Autowired
protected WebApplicationContext wac;
}
And now let's create our test classes:
package com.raissi.spring.test;

import org.junit.Test;
import org.junit.runner.RunWith;
import org.slf4j.Logger;
import org.slf4j.LoggerFactory;
import org.slf4j.Marker;
import org.slf4j.MarkerFactory;
import org.springframework.beans.factory.annotation.Autowired;
import org.springframework.test.context.junit4.SpringJUnit4ClassRunner;

import com.raissi.PersonService;

@RunWith(SpringJUnit4ClassRunner.class)
public class PersonServiceTest extends AbstractContextTests {

 private static final Logger logger = LoggerFactory.getLogger(PersonServiceTest.class);
 private static final Marker CACHE_LOG = MarkerFactory.getMarker("AUDIT_SYS");

 @Autowired
 private PersonService personService;

 @Test
 public void test(){
  final String dept1 = "DEPT1";
  for(int i=0; i <3; i++){
   logger.info("Calling PersonService for unit names of dept {}, got {}", dept1, personService.getDepartmentUnitNames(dept1));
   logger.info("Calling PersonService for persons names of dept {}, got {}", dept1, personService.getPersonNames(dept1));
  }

  logger.debug(CACHE_LOG, "Adding new person {} to dept: {} with evict", "PERS04", dept1);
  personService.savePersonInDepartment("PERS04", dept1);
  logger.debug(CACHE_LOG, "Calling PersonService for persons names of dept {}, got {}", dept1, personService.getPersonNames(dept1));

  logger.info("Adding new person {} to dept: {} with no evict", "PERS05", dept1);
  personService.savePersonInDepartmentNoEvict("PERS05", dept1);
  logger.info("Calling PersonService for persons names of dept {}, got {}", dept1, personService.getPersonNames(dept1));


  logger.debug(CACHE_LOG, "Adding new person {} to dept: {} with evict", "PERS06", dept1);
  personService.savePersonInDepartment("PERS06", dept1);
  logger.debug(CACHE_LOG, "Calling PersonService for persons names of dept {}, got {}", dept1, personService.getPersonNames(dept1));
 }
}
And that's it, you just right click on the class and chose Run As -> JUnit Test.I hope this will be of some help.


