Showing posts with label Spring. Show all posts

Monday, June 30, 2014

Spring sample application, environment dependent properties files, Logback, JUnit and Ehcache

In this article we will create a basic maven Spring application. The application will contain following features:

  1. Depending on an environment variable (call it env), the application will specific parameters, e.g: DB URL, schemas, and so on.
  2. The application must write some custom log messages to a particular log file. Let's say that this file will contain specific log messages to be visualised by admin
  3. The application will use Ehcache to cache calls to specific methods
PS: The source code of this article is on github.

1. Create the project with maven

First, let's create a maven web project. To do so, go to project placement (where you want to create the project) and run following command (you must have maven installed, see the link for instructions):

mvn archetype:generate -DarchetypeArtifactId=maven-archetype-webapp

 It will ask you to enter the groupId, the artifactId, the version and the package for the newly generated project.
After that, go to Eclipse (or your favorite IDE) and import the project. In Eclipse, right click in the project explorer and chose Import -> Import... After that, a dialog will be opened:

Chose "Existing Maven Projects" and click Next>.
Now browse to where you executed the mvn command and select the newly created (by maven) project having for name the value of artifact that you gave:


And click Finish.
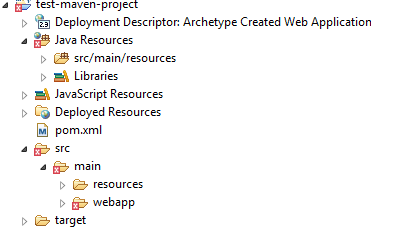
You will see the newly imported project under your projects explorer in Eclipse:


Now right click on src/main folder and chose New->Folder and name it "java"
After that, right click on src folder and chose New->Folder and name it "test". And add another folder named "java" under the newly created "test" folder. Now you project should look like this:


Now open the pom.xml file and change it so it looks like the following:

<project xmlns="http://maven.apache.org/POM/4.0.0" xmlns:xsi="http://www.w3.org/2001/XMLSchema-instance"
  xsi:schemaLocation="http://maven.apache.org/POM/4.0.0 http://maven.apache.org/maven-v4_0_0.xsd">
  <modelVersion>4.0.0</modelVersion>
  <groupId>com.raissi</groupId>
  <artifactId>test-maven-project</artifactId>
  <packaging>war</packaging>
  <version>1.0-SNAPSHOT</version>
  <name>test-maven-project Maven Webapp</name>
  <url>http://maven.apache.org</url>
  <dependencies>
   <!-- Just for tests -->
 <dependency>
  <groupId>javax.servlet</groupId>
  <artifactId>javax.servlet-api</artifactId>
  <version>3.0.1</version>
  <scope>test</scope>
 </dependency>
    <dependency>
      <groupId>junit</groupId>
      <artifactId>junit</artifactId>
      <version>4.11</version>
      <scope>test</scope>
    </dependency>
  </dependencies>
  <properties>
  <spring.version>4.0.4.RELEASE</spring.version>
  <project.build.sourceEncoding>UTF-8</project.build.sourceEncoding>
  </properties>
  <build>
  <finalName>spring-cache-tutorial</finalName>
  <plugins>
   <plugin>
    <groupId>org.apache.maven.plugins</groupId>
    <artifactId>maven-compiler-plugin</artifactId>
    <version>3.1</version>
    <configuration>
     <source>1.7</source>
     <target>1.7</target>
     <encoding>${project.build.sourceEncoding}</encoding>
    </configuration>
   </plugin>
   <plugin>
    <groupId>org.apache.maven.plugins</groupId>
    <artifactId>maven-war-plugin</artifactId>
    <version>2.4</version>
    <configuration>
     <archive>
      <manifestEntries>
       <DisableIBMJAXWSEngine>true</DisableIBMJAXWSEngine>
      </manifestEntries>
     </archive>
    </configuration>
   </plugin>

  </plugins>
 </build>
</project>

You need now to run (right click on the project) Maven->Update Project...
Now the project should be ready to add some code to it.

2. Prepare the Spring application

As said in the introduction, this is a Spring application, so first we need to add the Spring dependenciies to our project. In pom.xml file, add following:

<dependency>
   <groupId>org.springframework</groupId>
   <artifactId>spring-core</artifactId>
   <version>${spring.version}</version>
   <exclusions>
    <exclusion>
     <groupId>commons-logging</groupId>
     <artifactId>commons-logging</artifactId>
    </exclusion>
   </exclusions>
  </dependency>
  <dependency>
   <groupId>org.springframework</groupId>
   <artifactId>spring-beans</artifactId>
   <version>${spring.version}</version>
  </dependency>
  <dependency>
   <groupId>org.springframework</groupId>
   <artifactId>spring-aop</artifactId>
   <version>${spring.version}</version>
  </dependency>
  <dependency>
   <groupId>org.springframework</groupId>
   <artifactId>spring-context</artifactId>
   <version>${spring.version}</version>
   <exclusions>
    <exclusion>
     <groupId>commons-logging</groupId>
     <artifactId>commons-logging</artifactId>
    </exclusion>
   </exclusions>
  </dependency>
  <!-- Various Application Context utilities, including EhCache, JavaMail, 
   Quartz, and Freemarker integration Define this if you need any of these integrations -->
  <dependency>
   <groupId>org.springframework</groupId>
   <artifactId>spring-context-support</artifactId>
   <version>${spring.version}</version>
  </dependency>
  <dependency>
   <groupId>org.springframework</groupId>
   <artifactId>spring-tx</artifactId>
   <version>${spring.version}</version>
  </dependency>
  <dependency>
   <groupId>org.springframework</groupId>
   <artifactId>spring-jdbc</artifactId>
   <version>${spring.version}</version>
  </dependency>
  <dependency>
   <groupId>org.springframework</groupId>
   <artifactId>spring-web</artifactId>
   <version>${spring.version}</version>
  </dependency>

  <dependency>
   <groupId>org.aspectj</groupId>
   <artifactId>aspectjweaver</artifactId>
   <version>1.7.4</version>
  </dependency>
  <dependency>
   <groupId>org.aspectj</groupId>
   <artifactId>aspectjrt</artifactId>
   <version>1.7.4</version>
  </dependency>
  <!-- JSR 330 -->
  <dependency>
   <groupId>javax.inject</groupId>
   <artifactId>javax.inject</artifactId>
   <version>1</version>
  </dependency>

Now let's create the applicationContext.xml file to configure Spring: Under src/main/webapp/WEB-INF add a file named applicationContext.xml:

Next, open the file and add the following:

<beans xmlns="http://www.springframework.org/schema/beans"
 xmlns:xsi="http://www.w3.org/2001/XMLSchema-instance" xmlns:aop="http://www.springframework.org/schema/aop"
 xmlns:context="http://www.springframework.org/schema/context" xmlns:p="http://www.springframework.org/schema/p"
 xmlns:tx="http://www.springframework.org/schema/tx" xmlns:task="http://www.springframework.org/schema/task"
 xmlns:cache="http://www.springframework.org/schema/cache"
 xsi:schemaLocation="http://www.springframework.org/schema/beans
 http://www.springframework.org/schema/beans/spring-beans-4.0.xsd
 http://www.springframework.org/schema/context
 http://www.springframework.org/schema/context/spring-context-4.0.xsd
 http://www.springframework.org/schema/tx
    http://www.springframework.org/schema/tx/spring-tx-4.0.xsd
    http://www.springframework.org/schema/aop
    http://www.springframework.org/schema/aop/spring-aop-4.0.xsd
    http://www.springframework.org/schema/task
    http://www.springframework.org/schema/task/spring-task-4.0.xsd
    http://www.springframework.org/schema/cache 
    http://www.springframework.org/schema/cache/spring-cache-4.0.xsd">

 <!-- Base package for Spring to look for annotated beans -->
 <context:component-scan base-package="com.raissi" />
 <!-- Activates various annotations to be detected in bean classes: Spring's @Required and @Autowired, as well as JSR 
    250's @PostConstruct, @PreDestroy and @Resource (if available) etc...-->
 <context:annotation-config></context:annotation-config>

</beans>

For now, the file contains only the base package to tell Spring where to find our beans. And also the context:annotation-config to tell Spring that we are using annotations to define our resources.

3. Properties file

By now, we have Spring correctly configured. So let's move to the first requirement of our application.
The goal here is to have multiple properties files, and that our application uses the right one for every environment. 
Let's say you have different servers on different machines, one of these servers is dedicated to DEV teams, another is for TEST teams, and another one is for PRODUCTION. And that you are using Jenkins or another Continuous Integration tool to build and deploy your application.
Evidently, the 3 environments have different values for config parameters like DB URL, username and password etc...
To not be obliged to change these values manually in your properties files, or using maven to change them, we will create three properties files, each one is dedicated to a specific environment:
spring-sample.dev.propertiesspring-sample.test.properties and spring-sample.prod.properties. Please notice that the only difference in their names is the words "dev", "test" and "prod" after "spring-sample".
The idea is to tell Spring to load the appropriate file based on an environment variable that we will call "env".
In a PRODUCTION server, the value "env" must be equal to "prod" so our application loads the spring-sample.prod.properties file. Same thing for DEV and TEST environments.
So you must create a new environment variable in your system having "env" as a name, and either "dev", "test" or "prod" as value. You can change the value later to check that the right file is being loaded.
After creating the variable, you must shutdown Eclipse and start it again so that it can be aware of the newly created variable. Notice, that if you click on "Restart" eclipse, the JVM does not exit, and by that the new variable is not discovered.
After that, let's edit the applicationContext.xml file to add following entry:

<!-- application.properties will contain all our config data: db username, 
  password, etc... -->
 <context:property-placeholder
  location="classpath:spring-sample.${env}.properties"/>
As the documentation says, the "property-placeholder" entry "Activates replacement of ${...} placeholders by registering a PropertySourcesPlaceholderConfigurer within the
 application context". For example, if you want to define a dataSource to access the DB and have its parameters like jdbcUrl been defined in the properties file, you just write the following:

<bean id="dataSource" class="com.mchange.v2.c3p0.ComboPooledDataSource"  destroy-method="close">
 <property name="driverClass" value="${db.className}" />
 <property name="jdbcUrl" value="${db.url}" />
 <property name="user" value="${db.username}" />
 <property name="password" value="${db.password}" />     
</bean>
And then in your spring-sample.dev.properties file (we suppose your "env" variable value is equal to "dev"), define values for db.className, db.url etc...
e.g: db.username=raissi.

And that's it!! Very simple, but very useful. By now, depending on your environment type, Spring will load the appropriate properties file.

4. Add Logback

Logback is a logging library for Java. It "is intended as a successor to the popular log4j project". Written by the same author of log4j, Logback offers a faster implementation, "Logback is intended as a successor to the popular log4j project". More reasons why you should use Logback can be found here.
To use Logback, you need firstly to add its dependencies to your pom.xml:

<!-- SLF4J -->
  <dependency>
   <groupId>org.slf4j</groupId>
   <artifactId>slf4j-api</artifactId>
   <version>1.7.5</version>
  </dependency>

  <dependency>
   <groupId>org.slf4j</groupId>
   <artifactId>jcl-over-slf4j</artifactId>
   <version>1.7.5</version>
  </dependency>

  <!-- Log Back -->
  <dependency>
   <groupId>ch.qos.logback</groupId>
   <artifactId>logback-classic</artifactId>
   <version>1.1.1</version>
  </dependency>
  <dependency>
   <groupId>ch.qos.logback</groupId>
   <artifactId>logback-core</artifactId>
   <version>1.1.1</version>
  </dependency>

You may also have noticed, that in Spring dependencies I excluded commons-logging. In fact, Spring uses by default Commons Logging for their logs. And to make it use Logback, you must exclude commons-logging like I did for Spring dependencies
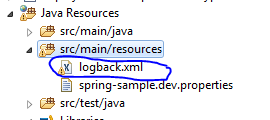
Now, let's configure Logback. It's very simple, all you need is to add (like log4j) an XML file called logback.xml to your application classpath:

P.S: If you were using Log4j and you want just to convert your log4j.properties file automatically, there is an online tool for this.
Before configuring our loggings, let's explain what we want to do:

  1. The console must display all logs (depending on our global log level)
  2. There must be a log file for every level, one for debug, one for error and one for info messages
  3. There must be some particular messages (of any level) that must be written to a special file. Let's say they are special messages intended for admins of the application.
  4. When reaching a particular size, the log file is compressed in a zip archive.
from the docs, "Logback delegates the task of writing a logging event to components called appenders". So you need to define an appender for each specific need. for example, to write to the console:

<appender name="STDOUT" class="ch.qos.logback.core.ConsoleAppender">
  <encoder>
   <pattern>%d{[yyyy-MM-dd] HH:mm:ss.SSS} %-5level %logger{36} - %msg%n</pattern>
  </encoder>
 </appender>
This does not do so much. Let's now define an appender that writes info messages to a specific file:


<!-- We use a RollingFileAppender to backup the log files depending in the previously mentioned ZIP archives -->
 <appender name="FILE-INFO"
  class="ch.qos.logback.core.rolling.RollingFileAppender">
  <!-- The file location -->
  <file>${log.basefolder}/${log.info.filename}</file>
 
  <!-- The rolling policy how to rollover files 
    Here I am chosing to to keep up to 3 zip archives, and then delete the oldest one
  -->
  <rollingPolicy class="ch.qos.logback.core.rolling.FixedWindowRollingPolicy">
   <fileNamePattern>${log.rolling.folder}/sample-info.%i.log.zip</fileNamePattern>
   <minIndex>1</minIndex>
   <maxIndex>3</maxIndex>
  </rollingPolicy>
 
  <!-- The trigger to rollover a file, here I'm using a size based trigger. When file is up to maxFileSize, a rollover takes place -->
  <triggeringPolicy
   class="ch.qos.logback.core.rolling.SizeBasedTriggeringPolicy">
   <maxFileSize>${log.file.maxSize}</maxFileSize>
  </triggeringPolicy>
  
  <!-- The pattern for our messages, just like Log4j -->
  <encoder>
   <pattern>%d{[yyyy-MM-dd] HH:mm:ss.SSS} %-5level %logger{36} - %msg%n</pattern>
  </encoder>
  <!-- The level filter, accept only INFO messages in this appender -->
  <filter class="ch.qos.logback.classic.filter.LevelFilter">
   <level>INFO</level>
   <onMatch>ACCEPT</onMatch>
   <onMismatch>DENY</onMismatch>
  </filter>
 </appender>
You can see in the comments inside the code that we are using an Appender to accept only INFO messages, and to write them to a specific file. We are also using a Rollover policy to backup files into up to 3 zip archives, and then when max size exceeded, delete the oldest one and continue.
One other thing to notice, is the use of placeholders like: ${log.info.filename}. 
To be able to use such placeholders, you neeed to add a property to specify from where to load these placeholder values:

<property resource="spring-sample.${env}.properties" />
And here we are referring to our environment dependent resource file, previously used with Spring. The nice thing here, is that Logback recognizes environment variables, just like Spring does.
Here is an example of my  spring-sample.dev.properties file:

log.basefolder=path-to-a-folder-that-will-contain-our-log-files
log.info.filename=sample-info.log
log.debug.filename=sample-debug.log
log.error.filename=sample-error.log
log.audit.filename=sample-audit.log

#Max size for a log file
log.file.maxSize=5MB
#folder to save in log files when the log size exceeds maxSize
log.rolling.folder=path-to-a-folder-that-will-contain-our-log-files-archives

Same thing should be done for debug and error levels.
Another thing we need with our logs, is to have a custom file for admin messages. To do so, we need to use another filter for our appender other than the LevelFilter previously used with INFO messages.
this time, we will use an EvaluatorFilter that use Markers to decide of the type of messages:

<appender name="AUDIT_FILE" class="ch.qos.logback.core.FileAppender">
  <!-- the filter element -->
  <filter class="ch.qos.logback.core.filter.EvaluatorFilter">
   <evaluator class="ch.qos.logback.classic.boolex.OnMarkerEvaluator">
    <!-- you can use any other value, just make sure, you use the same value in your Java code -->
    <marker>AUDIT_SYS</marker>
   </evaluator>
   <onMismatch>DENY</onMismatch>
   <onMatch>ACCEPT</onMatch>
  </filter>
  
  <file>${log.basefolder}/${log.audit.filename}</file>
  <encoder>
   <pattern>%d{[yyyy-MM-dd] HH:mm:ss.SSS} %level %logger{36} - %msg %n</pattern>
  </encoder>

  <rollingPolicy class="ch.qos.logback.core.rolling.FixedWindowRollingPolicy">
   <fileNamePattern>${log.rolling.folder}/sample-audit.%i.log.zip</fileNamePattern>
   <minIndex>1</minIndex>
   <maxIndex>3</maxIndex>
  </rollingPolicy>

  <triggeringPolicy
   class="ch.qos.logback.core.rolling.SizeBasedTriggeringPolicy">
   <maxFileSize>${log.file.maxSize}</maxFileSize>
  </triggeringPolicy>
 </appender>
Here the only that changed (compared to previous appender for INFO messages) is the Filter part.

The last thing to do, is tell Logback to use our defined appenders, and also to specify the global log level for our application:

 <!-- Levels by packages and classes: --> 
 <!-- you can define as many as you want loggers. just like in Log4j, 
 and this may be also by class or by package -->
    <logger name="com.sample.services" level="debug"/>
    <logger name="org.springframework.jdbc.core" level="TRACE">
    <appender-ref ref="STDOUT" />
    </logger>
 <logger name="com.sample.Foo" level="info"/>
 
 <root level="debug">
  <appender-ref ref="STDOUT" />
  <appender-ref ref="FILE-INFO" />
  <appender-ref ref="FILE-DEBUG" />
  <appender-ref ref="FILE-ERROR" />
  <appender-ref ref="AUDIT_FILE" />
 </root>
The last thing to do now is to log some messages from our Java code:
package com.raissi;

import org.junit.Test;
import org.slf4j.Logger;
import org.slf4j.LoggerFactory;
import org.slf4j.Marker;
import org.slf4j.MarkerFactory;

public class LogbackDemoClass {

    private static final Logger LOGGER = LoggerFactory.getLogger(LogbackDemoClass.class);
    private static final Marker CACHE_LOG = MarkerFactory.getMarker("AUDIT_SYS");
    
    @Test
    public void testLogs(){
        LOGGER.debug("This message will go to debug file only, and will contain a param: {}", "paramValue");
        LOGGER.debug(CACHE_LOG, "This message will go to debug file and admin log file also, and will contain a param: {}", "paramToAdmin");
    }
}
Few thing are to note here:

  • We use the same value to build the Marker object as the one defined in logback.xml file
  • No need to test if debug is enabled like we should do in other logging libraries
  • We use placeholders to introduce parameters, so that the complete String message is only built if the message is really going to be printed
By now, you should have a very good and convenient Logback configuration. So enjoy logging!!

5. Caching with Ehcache

The last part of this article, is to configure Ehcache to be used with our Spring application. It's mainly used to cache expensive calls that have results which change rarely, or at known rate.
If you google for "Ehcache with Spring example", you will find so many tutorials about this subject. So why am I writing about it again ? It's to address a point rarely considered on these tutorials. 
So let's begin by configuring Ehcache for our application.
First thing to do, is to add Ehcache dependecies to you pom.xml file:

  <!-- Ehcache -->
  <dependency>
   <groupId>net.sf.ehcache</groupId>
   <artifactId>ehcache</artifactId>
   <version>2.7.4</version>
  </dependency>

Next you need to configure Spring to use Ehcache for our caching. In fact, Spring can be configured to use multiple cache implementations. See the docs for more details.
So, in applicationContext.xml file, add the following:

<!-- Tell Spring that we going to use cache annotations in our Java code -->
 <cache:annotation-driven/>
 <bean id="cacheManager" class="org.springframework.cache.ehcache.EhCacheCacheManager"
  p:cache-manager-ref="ehcache" />
 <!-- EhCache library setup -->
 <bean id="ehcache"
  class="org.springframework.cache.ehcache.EhCacheManagerFactoryBean"
  p:config-location="classpath:ehcache.xml" />
Here we are referring to a file named "ehcache.xml", it's there where to configure Ehcache, about how to define our cache. see this page for details about what you should define there.
Here is my ehcache.xml file:

<?xml version="1.0" encoding="UTF-8"?>
<ehcache xmlns:xsi="http://www.w3.org/2001/XMLSchema-instance"
 xsi:noNamespaceSchemaLocation="http://ehcache.org/ehcache.xsd">
 <defaultCache eternal="false" maxElementsInMemory="100"
  overflowToDisk="false" />
 <cache name="spring-cache" maxElementsInMemory="1000000" eternal="false"
  overflowToDisk="false" />
</ehcache>
Main things to notice here are the cache named "spring-cache", we will refer to it in our cache annotations later. There also the maxElementsInMemory property that defines to max elements to be contained in this cache. You can define more than one cache.
Now in your Spring beans, you just add annotations to cache method calls, or to evict elements from cache:
Here is a simple example of a service class:

package com.raissi;

import java.util.ArrayList;
import java.util.Arrays;
import java.util.List;

import org.slf4j.Logger;
import org.slf4j.LoggerFactory;
import org.slf4j.Marker;
import org.slf4j.MarkerFactory;
import org.springframework.cache.annotation.CacheEvict;
import org.springframework.cache.annotation.Cacheable;
import org.springframework.stereotype.Service;

@Service
public class PersonServiceImpl implements PersonService{
 
 private static final Logger LOGGER = LoggerFactory.getLogger(PersonServiceImpl.class);
 private static final Marker CACHE_LOG = MarkerFactory.getMarker("AUDIT_SYS");
 
 private List<String> units = new ArrayList<>(Arrays.asList("UNIT01", "UNIT02", "UNIT03"));
 private List<String> persons = new ArrayList<>(Arrays.asList("PERSON01", "PERSON02", "PERSON03"));
 
 
 @Override
 @Cacheable(value = "spring-cache")
 public List<String> getPersonNames(String department){
  LOGGER.info(CACHE_LOG, "Getting Person names of department {}", department);
  return new ArrayList<>(persons);
 }

 @Override
 @Cacheable(value = "spring-cache")
 public List<String> getDepartmentUnitNames(String department) {
  LOGGER.info(CACHE_LOG, "Getting unit names of department {}", department);
  return units;
 }
 
 @Override
 @CacheEvict(value = { "spring-cache" }, key="#root.targetClass.getName() + 'getPersonNames' + #department")
 public void savePersonInDepartment(String person, String department){
  persons.add(person);
 }
 
 @Override
 public void savePersonInDepartmentNoEvict(String person, String department){
  persons.add(person);
 }
}

Just very simple. whenever we want to cache a method call, we annotate it with Cacheable, giving the cache name as value.
The only point that may be a little tricky here is the CacheEvict annotation. This is used, to evict an entry from the cache. Let me explain.
In the case of the getPersonNames(String department) method, we are caching its results, for example, when first time, you call getPersonNames("DEPT01") the call is going to invoke the method implementation returning list of persons in department "DEPT01".
Next time the method is called, the result is fetched from the cache, which means, the method implementation won't be invoked.
Now, what if we want to add a new person to this department. In this situation, we have to evict the entry associated with the DEPT01 from the cache. This is done by annotating the method that modifies the content of DEPT01 with CacheEvict. We need to give the annotation the key of the entry to be deleted from the cache. Which gets us to the main point of the part of the article. The cache keys.

Default cache key generator in Spring

When caching a method call (which is similar to putting an object in a map), Spring generates a key for it so it can be got next time a call made to that method. For this, Spring offers a default key generation mechanism. This is done via DefaultKeyGenerator in Spring versions prior to Spring 4. In Spring 4, the default key generator is SimpleKeyGenerator.
If you look at the code of key generation :

@Override
 public Object generate(Object target, Method method, Object... params) {
  if (params.length == 0) {
   return SimpleKey.EMPTY;
  }
  if (params.length == 1) {
   Object param = params[0];
   if (param != null && !param.getClass().isArray()) {
    return param;
   }
  }
  return new SimpleKey(params);
 }
And here, you can notice that only the parameters of the method are considered in key generating.
You can refer to this Jira issue to see a discussion about it.
So, by default, both our cached methods getPersonNames and getDepartmentUnitNames would return same values on their second calls with the same "DEPT01" value as parameters.
And this would be really catastrophic if not considered.
So what to do ?
First solution, would be to add a key to every Cacheable annotation like this:

@Cacheable(value="atlas", key="#root.targetClass + #root.methodName + #department")
This will add the class name and the method name to the generated key. And this really solves the problem.

Custom key generator

Using the mentioned solution to give special key to every method, solves the problem, but this would be a tedious task to add a key to every Cacheable annotation, and it would be a bug generator, in case one forgets to include a parameter in the key.
A better solution for this would be to tell Spring to use our custom key generator instead of the SimpleKeyGenerator.
For this, we need to add a new class implementing the KeyGenerator interface:


package com.raissi.spring.cache;

import java.lang.reflect.Method;

import org.springframework.cache.interceptor.KeyGenerator;

public class CacheKeyGenerator implements KeyGenerator {

 @Override
 public Object generate(final Object target, final Method method,
   final Object... params) {
  StringBuilder key = new StringBuilder(method.getDeclaringClass().getName()).append(method.getName());
  if(params != null){
   for(Object obj: params){
    key.append(obj.toString());
   }
  }
  return key.toString();
 }
}
Now we are including the method and class names in the generated key. The only thing that remains is to tell Spring to use our CacheKeyGenerator instead of SimpleKeyGenerator.
In applicationContext.xml; 
<!-- Change it to reference our KeyGenerator class -->
<cache:annotation-driven key-generator="cacheKeyGenerator" />
<bean id="cacheKeyGenerator" class="com.raissi.spring.cache.CacheKeyGenerator" />
Notice that I changed the cache:annotation-driven to include a key-generator attribute.

And that's it!

6. Testing your Spring applications with JUnit

The final part of this article is to show you how to test your beans with JUnit and Spring-test.
First add following dependencies:

<!-- Tests -->
  <dependency>
   <groupId>org.springframework</groupId>
   <artifactId>spring-test</artifactId>
   <version>${spring.version}</version>
  </dependency>
  <!-- JUnit -->
  <dependency>
   <groupId>junit</groupId>
   <artifactId>junit</artifactId>
   <version>4.11</version>
   <scope>test</scope>
  </dependency>

  <!-- Mockito -->
  <dependency>
   <groupId>org.mockito</groupId>
   <artifactId>mockito-core</artifactId>
   <version>1.9.5</version>
   <scope>test</scope>
  </dependency>
Next, go to "Java resources, src/test/java" and create a new package:

There we will create a base class: AbstractContextTests, all other test classes will extend it. This class will define context config location of Spring, it ensures that a WebApplicationContext will be loaded for the test:

package com.raissi.spring.test;

import org.springframework.beans.factory.annotation.Autowired;
import org.springframework.test.context.ContextConfiguration;
import org.springframework.test.context.web.WebAppConfiguration;
import org.springframework.web.context.WebApplicationContext;

@WebAppConfiguration
@ContextConfiguration(value={"file:src/main/webapp/WEB-INF/applicationContext.xml"})
public class AbstractContextTests {

 @Autowired
 protected WebApplicationContext wac;

}
And now let's create our test classes:
package com.raissi.spring.test;

import org.junit.Test;
import org.junit.runner.RunWith;
import org.slf4j.Logger;
import org.slf4j.LoggerFactory;
import org.slf4j.Marker;
import org.slf4j.MarkerFactory;
import org.springframework.beans.factory.annotation.Autowired;
import org.springframework.test.context.junit4.SpringJUnit4ClassRunner;

import com.raissi.PersonService;

@RunWith(SpringJUnit4ClassRunner.class)
public class PersonServiceTest extends AbstractContextTests {

 private static final Logger logger = LoggerFactory.getLogger(PersonServiceTest.class);
 private static final Marker CACHE_LOG = MarkerFactory.getMarker("AUDIT_SYS");
 
 @Autowired
 private PersonService personService;
 
 @Test
 public void test(){
  final String dept1 = "DEPT1";
  for(int i=0; i <3; i++){
   logger.info("Calling PersonService for unit names of dept {}, got {}", dept1, personService.getDepartmentUnitNames(dept1));
   logger.info("Calling PersonService for persons names of dept {}, got {}", dept1, personService.getPersonNames(dept1));
  }
  
  logger.debug(CACHE_LOG, "Adding new person {} to dept: {} with evict", "PERS04", dept1);
  personService.savePersonInDepartment("PERS04", dept1);
  logger.debug(CACHE_LOG, "Calling PersonService for persons names of dept {}, got {}", dept1, personService.getPersonNames(dept1));
  
  logger.info("Adding new person {} to dept: {} with no evict", "PERS05", dept1);
  personService.savePersonInDepartmentNoEvict("PERS05", dept1);
  logger.info("Calling PersonService for persons names of dept {}, got {}", dept1, personService.getPersonNames(dept1));
  
  
  logger.debug(CACHE_LOG, "Adding new person {} to dept: {} with evict", "PERS06", dept1);
  personService.savePersonInDepartment("PERS06", dept1);
  logger.debug(CACHE_LOG, "Calling PersonService for persons names of dept {}, got {}", dept1, personService.getPersonNames(dept1));
 }
}

And that's it, you just right click on the class and chose Run As -> JUnit Test.

I hope this will be of some help.

Friday, July 19, 2013

Use Spring JavaMailSender and Freemarker to send Newsletter from your JSF2 applications

Newsletters are a very powerful way to keep in touch with your web site users. They also are widely used as a mean of marketing. So how to generate and send a Newsletter in your JSF2 application ?

1) Use a template engine

As stated in Wikipedia, a template engine is "a software that is designed to process web templates and content information to produce output web documents".
So the idea is very simple, like when dealing with Facelets pages, we define a template page for our Newsletter, and then use the template engine to generate a new text based on merging this template and data we pass to it.
There are so many template engines in the open source market. Between them there is Freemarker, Velocity, StringTemplate, Thymeleaf and so many others. Personally I worked with Velocity and Freemarker. Both are very flexible and very powerful. 
If you want to use Velocity with your Newsletters you can find a little example for Spring integration here. In this article we will be using Freemarker.

2) Pick a template for Newsletter

First thing to do (just as when developing a web page) is to design our Newsletter. You can ask your designer to create a static pure HTML Newsletter template. For me, I just chose this free template. And here is a screenshot of it:

It's quite simple. It contains a list of head titles (under "In this issue"). It contains also a list of latest articles: every article will contain a title, a description and eventually an image (the image can be null). The newsletter will also contain a link to unsubscribe from our mailing list. 

3) Add Maven dependencies

You need to add Freemarker, JavaMail (required by Spring mail) and if you didn't already include it, Spring Context support. So in your POM file, make sure to include these dependencies:


  org.springframework
  spring-context-support
  ${org.springframework.version}


 javax.mail
 mail
 1.4.7


 org.freemarker
 freemarker
 2.3.14

4) Data model

Now we need to prepare our data model (if you didn't already) for the newsletter. As I said, we will display a list header titles (let's say this will present flash news), and a list of latest articles and an unsubscribe link.
This is our Article class:

package com.raissi.domain.newsletter;

import java.io.Serializable;

public class Article implements Serializable{
	private static final long serialVersionUID = 2999207145055407788L;

	private String title;
	private String image;
	private String description;
	
	public Article() {
		super();
	}
	public Article(String title, String image, String description) {
		super();
		this.title = title;
		this.image = image;
		this.description = description;
	}
	
	public String getTitle() {
		return title;
	}
	public void setTitle(String title) {
		this.title = title;
	}
	public String getImage() {
		return image;
	}
	public void setImage(String image) {
		this.image = image;
	}
	public String getDescription() {
		return description;
	}
	public void setDescription(String description) {
		this.description = description;
	}		
}
For simplicity matter, I will use just a map of (title,url) pairs to display header titles. As for the unsubscribe link, it will point to unsbscribe-newsletter?token=encryptedUserEmail.

5) Implementation

5-a) Spring config

Spring provides a JavaMailSender utility that helps with handling mails, we will use it, 


			${mail.smtp.auth}
			${mail.smtp.port}
			${mail.host}
			true


Now add the Freemarker Configuration bean factory:


I think comments well explain each element in the above config.
Now let's create a service class that will be responsible for processing the template, generating the mail message and sending it via defined mailSender bean, in Spring add:


5-b) Service classes

And here is the MailService class:
package com.raissi.service.mail;

import java.util.Map;

import javax.mail.internet.MimeMessage;

import org.springframework.mail.javamail.JavaMailSender;
import org.springframework.mail.javamail.MimeMessageHelper;
import org.springframework.mail.javamail.MimeMessagePreparator;
import org.springframework.ui.freemarker.FreeMarkerTemplateUtils;

import freemarker.template.Configuration;

public class MailService {

	private JavaMailSender javaMailSender;
	private Configuration freemarkerConfiguration;
	
	public void sendMail(final String from, final String to, final String subject, final Map model, final String template){
		MimeMessagePreparator preparator = new MimeMessagePreparator() {
	         public void prepare(MimeMessage mimeMessage) throws Exception {
	            MimeMessageHelper message = new MimeMessageHelper(mimeMessage);
	            message.setFrom(from, "Raissi JSF2 sample");
       		    message.setTo(to);
       		    message.setSubject(subject);
       		    //template sample: "com/raissi/freemarker/confirm-register.ftl"
                String text = FreeMarkerTemplateUtils.processTemplateIntoString(freemarkerConfiguration.getTemplate(template,"UTF-8"), model);
	            message.setText(text, true);
	         }
	      };
		javaMailSender.send(preparator);
	}

	public void setJavaMailSender(JavaMailSender javaMailSender) {
		this.javaMailSender = javaMailSender;
	}

	public void setFreemarkerConfiguration(Configuration freemarkerConfiguration) {
		this.freemarkerConfiguration = freemarkerConfiguration;
	}	
}
The only tricky part of this class is the FreeMarkerTemplateUtils.processTemplateIntoString call. This method "Process the specified FreeMarker template with the given model and write the result to the given Writer." As for the model parameter, it's typically a Map that contains model names as keys and model objects as values.
This service class will be used by every class desiring to send an email with Freemarker as Template Engine in our application.
Now let's define a NewsLetterService class that will fetch data to be filled into the newsletter and then call mailService.sendMail:

package com.raissi.service.newsletter.impl;

import java.io.UnsupportedEncodingException;
import java.util.ArrayList;
import java.util.HashMap;
import java.util.List;
import java.util.Map;

import javax.inject.Inject;
import javax.inject.Named;

import org.springframework.stereotype.Service;
import org.springframework.transaction.annotation.Transactional;

import com.raissi.domain.User;
import com.raissi.domain.newsletter.Article;
import com.raissi.service.UserService;
import com.raissi.service.mail.MailService;
import com.raissi.service.newsletter.NewsLetterService;

@Service("newsLetterService")
@Transactional
public class NewsLetterServiceImpl implements NewsLetterService{
	private static final long serialVersionUID = -6291547874161783407L;
	
	@Inject	
	private @Named("mailService")MailService mailService;
	@Inject
	private UserService userService;
	
	public void sendNewsLetter(User user){
		//Generate the Unsubscribe link, it will contain the user's email encrypted
		try {
			/*
			 * Will generate a complete url to the specified pageName and containing the tokenToBeEncrypted 
			 * as encrypted param, ex: http://mysite.com/confirm-registration?token=userNameEncrypted 
			 */
			String unsubscribeUrl = userService.generateUserToken("unsbscribe-newsletter", user.getEmail());
			//Get the site base url from the above url, and use it for images urls
			//It will be in the form: http://mysite.com/resources/freemarker
			String baseUrl = unsubscribeUrl.substring(0,unsubscribeUrl.indexOf("/unsbscribe")+1)+"resources/freemarker";
			List
latestArticles = getLatestArticles(); Map headerTitles = getHottestNews(); String newsSourceUrl = "http://www.richarddawkins.net/"; String newsSourceName = "Richard Dawkins Foundation for Reason and Science"; Map model = new HashMap(); model.put("unsubscribeUrl", unsubscribeUrl); model.put("latestArticles", latestArticles); model.put("headerTitles", headerTitles); model.put("newsSourceUrl", newsSourceUrl); model.put("newsSourceName", newsSourceName); model.put("baseUrl", baseUrl); mailService.sendMail("raissi.java@gmail.com", user.getEmail(), "Our Newsletter", model, "com/raissi/freemarker/newsletter.ftl"); } catch (UnsupportedEncodingException e) { // TODO Auto-generated catch block e.printStackTrace(); } } public Map getHottestNews(){ Map news = new HashMap(); //Just for testing purpose, we will generate a static list of news news.put("Richard Dawkins to headline unique Bristol event, Sat. 24th August","http://www.richarddawkins.net/news_articles/2013/7/19/richard-dawkins-to-headline-unique-bristol-event-sat-24th-august-2013"); news.put("Parliament 'must pardon codebreaker Turing'","http://www.richarddawkins.net/news_articles/2013/7/19/parliament-must-pardon-codebreaker-turing"); news.put("Curiosity team: Massive collision may have killed Red Planet","http://www.richarddawkins.net/news_articles/2013/7/19/curiosity-team-massive-collision-may-have-killed-red-planet"); news.put("Tyrannosaurus rex hunted for live prey","http://www.richarddawkins.net/news_articles/2013/7/18/tyrannosaurus-rex-hunted-for-live-prey"); return news; } public List
getLatestArticles(){ List
latestArticles = new ArrayList
(); //Just for testing purpose, we will generate a static list of Articles //Noam Chomsky String chomskyDesc = "Avram Noam Chomsky (/ˈnoʊm ˈtʃɒmski/; born December 7, 1928) is an American linguist," + " philosopher, cognitive scientist, logician, political critic, and activist. " + "He is an Institute Professor and Professor (Emeritus) in the Department of Linguistics & Philosophy at MIT, " + "where he has worked for over 50 years. " + "In addition to his work in linguistics, he has written on war, politics, and mass media, " + "and is the author of over 100 books.[13] Between 1980 and 1992, " + "Chomsky was cited within the field of Arts and Humanities more often than any other living scholar, " + "and eighth overall within the Arts and Humanities Citation Index during the same period." + " He has been described as a prominent cultural figure, and was voted the \"world's top public intellectual\" " + "in a 2005 poll.[18]"; String chomskyImg = "http://upload.wikimedia.org/wikipedia/commons/thumb/6/6e/Chomsky.jpg/200px-Chomsky.jpg"; Article noamChomsky = new Article("Noam Chomsky", chomskyImg, chomskyDesc); latestArticles.add(noamChomsky); //Richard Dawkins String dawkinsImg = "http://upload.wikimedia.org/wikipedia/commons/thumb/a/a0/Richard_Dawkins_Cooper_Union_Shankbone.jpg/250px-Richard_Dawkins_Cooper_Union_Shankbone.jpg"; String dawkinsDesc = "Clinton Richard Dawkins, FRS, FRSL (born 26 March 1941) is an English ethologist," + " evolutionary biologist and author. He is an emeritus fellow of New College, Oxford," + " and was the University of Oxford's Professor for Public Understanding of Science from 1995 until 2008."; Article richardDawkins = new Article("Richard Dawkins", dawkinsImg, dawkinsDesc); latestArticles.add(richardDawkins); //Stephen Hawking String hawkingDesc = "Stephen William Hawking CH, CBE, FRS, FRSA (Listeni/ˈstiːvɛn hoʊkɪŋ/; stee-ven hoh-king; born 8 January 1942) " + "is an English theoretical physicist, cosmologist, author and Director of Research at the Centre for Theoretical Cosmology" + " within the University of Cambridge. Among his significant scientific works have been a collaboration with " + "Roger Penrose on gravitational singularities theorems in the framework of general relativity, " + "and the theoretical prediction that black holes emit radiation, often called Hawking radiation." + " Hawking was the first to set forth a cosmology explained by a union of the general theory of " + "relativity and quantum mechanics. He is a vocal supporter of the many-worlds interpretation of quantum mechanics."; Article stephenHawking = new Article("Stephen Hawking", null, hawkingDesc); latestArticles.add(stephenHawking); //Paul Nizan String nizanImg = "http://upload.wikimedia.org/wikipedia/commons/thumb/3/31/Nizanpaul.jpg/220px-Nizanpaul.jpg"; String nizanDesc = "Paul-Yves Nizan (French: [nizɑ̃]; 7 February 1905 – 23 May 1940) was a French philosopher and writer. " + "He was born in Tours, Indre-et-Loire and studied in Paris where he befriended fellow student Jean-Paul Sartre at the Lycée Henri IV." + " He became a member of the French Communist Party, and much of his writing reflects his political beliefs, " + "although he resigned from the party upon hearing of the Molotov-Ribbentrop Pact in 1939. " + "He died in the Battle of Dunkirk, fighting against the German army in World War II."; Article paulNizan = new Article("Paul Nizan", nizanImg, nizanDesc); latestArticles.add(paulNizan); return latestArticles; } }

The code of this class is very simple, there is only one thing that may be not clear. It's the call to userService.generateUserToken. In fact this method, is just a simple utility method to generate a url containing the specified token param encrypted and pointing to the passed page name param, here is its implementation:
public String generateUserToken(String pageName, String tokenToBeEncrypted) throws UnsupportedEncodingException{
		HttpServletRequest request = ((ServletRequestAttributes) RequestContextHolder.getRequestAttributes()).getRequest();
		String domain = "http://"+request.getServerName()+":"+request.getServerPort();
		String context = servletContext.getContextPath();
		//As in the getContextPath() docs, The path starts with a "/" character but does not end with a "/" character 
		context = domain+context;
		String encryptedToken = URLEncoder.encode(textEncryptor.encrypt(tokenToBeEncrypted),"UTF-8");
		return context+"/"+pageName+"?token="+encryptedToken;
}
Now everything is ready, but only the template page.

5-c) The Freemarker Template

To create the template, just copy the code of static HTML template that you chose (or your designer) and modify it by adding dynamic parts.
Let's start by the header titles. We said they are links to some news. In our Java data model, we passed them within a Map<String, String>: the title of the news is the key and the url is the value. The map is then put into the model param under the headerTitles key. To display this map in Freemarker, we use this syntax:

<#list headerTitles?keys as title>
    ${title}
</#list>

As for the latest articles list, we passed them as a List<Article> object under the key with value: latestArticles, and here is the Freemarker code to display that list:
<#list latestArticles as article>
${article.title}
<#if article.image??>																															</#if>
${article.description}
</#list>
Of course, here I omitted the CSS code and other design related HTML code.
As for the unsubscribe link, you should be able to guess its value:

Unsubscribe
As we passed the url to unsubscribe under the unsubscribeUrl within model param.
This is how my Newsletter seems as received in my Yahoo mail account (a part of, that my screen can display):

By now you should be able to send any kind of newsletter to your users.

6) Final (and very important) remarks

6-a) Inline styles

If you are using CSS styles defined in the head section of your template, then most of email clients will ignore it. See this link. So what will you do ? 
The answer is to use inline style, for example: 
instead of defining a style class that won't be recognized.
Now you be saying, but f**k how will I transform all those CSS classes into inline style? Well, the answer is with this awesome site.

6-b) Asynchronous execution

If you will use the above java MailService class as it's, and if you provide the user a button or a link to send him newsletter (or any other king of emails) when clicked, then the UI will be blocked until email is sent. And since this may take some long time (depending on your Email server and other Internet params), the process of sending emails should run asynchronously. You may think about using a Java Thread, which is completely legitimate.
The good news, is that Spring (with its great magic) offers the possibility of running methods asynchronously by simply adding an annotation: @Async. So in your MailService class annotate your sendMail with Async.
Note you must add the following directive (XML element) to your application context file, so that Spring will recognize the Async annotation:


And by now everything should be just perfect.
It will be great to see your comments

Thursday, July 18, 2013

JSF 2, Spring, Spring Security, Hibernate/JPA, Jasypt, application sample available at Github

If you have followed my previous articles series about JSF 2 and different frameworks integration, then you can find the complete application source code on Github here.
Please feel free to post your comments, suggestions and ameliorations

Protect you users passwords in with Jasypt

As recommended by OWASP, when storing users credentials, you always should encrypt user's password in a way that protects it from being stolen. In fact, if you are saving them in clear, and once your DB has been stolen, or accessed by even your DBA, this will make all passwords compromised. Now what about a user that used the same password for your application and his bank online account?
This been said, you should encrypt these passwords. And to do it, you have one of two possibilities:
1) Encrypt the password and save it in DB. For every attempt to login, retrieve the encrypted password, decrypt it and compare it to given password.
2) When user is registering, generate a hash code for his password and save it in DB. For every attempt to login, compare the stored hash with the generated hash of given password when login happens.
Both methods are robust if using robust algorithms. But I prefer second one. In fact, using the hash codes, makes the user the only person who can know the real password value. The first one, makes it possible for application developer to guess it.
In this article we will use Jasypt library to implement both methods. Jasypt is a java library which allows the developer to add basic encryption capabilities to his/her projects with minimum effort, and without the need of having deep knowledge on how cryptography works.

1) Transparent password encryption with Hibernate

To implement the first approach to secure passwords, Jasypt offers a very simple and transparent enryption method. To do it, just declare the following bean in your spring context:


          hibernateStringEncryptor
     
     
         simplepassword
     

This will create a HibernatePBEStringEncryptor object and register it with the "hibernateStringEncryptor" name. You should use a strong password to be used when encrypting your data.

Now, we only need to add Jasypt annotations to properties we want to be encrypted transparently, here is the User entity class:
import org.hibernate.annotations.Parameter;
import org.hibernate.annotations.TypeDef;
import org.hibernate.annotations.Type;
import org.jasypt.hibernate4.type.EncryptedStringType;
@Entity
@Table(name="user_table")
@TypeDef(
        name="encryptedString", 
        typeClass=EncryptedStringType.class, 
        parameters={@Parameter(name="encryptorRegisteredName",
                               value="hibernateStringEncryptor")}
)
public class User implements Serializable{
   //properties, here, especially the password property that we want to be encrypted:

   @Type(type="encryptedString")
   private String password;

   //Getters and Setters etc...
}
And that's all you need to do, now you can save your user objects and check the password field in DB, it will be encrypted.
Now when you wish to login a user, just check password equality as follows:
@Transactional(readOnly=true)
public User loginUser(String login, String password) {
        User user = userDao.findUserByLoginOrEmail(login);
 if(user != null ){
  if(password.equals(user.getPassword() )){
   return user;
  }
 }
 return null;
}
As you can see, we are not performing any encryption operation on data. Everything is transparent.
Please notice: never and ever use the password field on a where sql(or hql or jpql) query once it's annotated with @Type(type="encryptedString"), since it will be stored as an encrypted value, and you have no mean to compare an encrypted value against it.

2) Digest (hash code) generation for passwords

Now let's see the secodn (and my preferred method) for storing passwords. First thing to do, is to create a StringDigester bean in Spring: 


Although you can just instantiate this object whenever needed, I just wanted it to be a singleton object in the whole application. Now inject it in your service class and use it to digest passwords when saving users:
@Inject
private @Named("stringDigester")StandardStringDigester digester;
@Transactional(propagation=Propagation.REQUIRES_NEW)
public void saveUser(User user){
        //Digest password and save it
 user.setPassword(digester.digest(user.getPassword()));
 userDao.save(user);
}

//Login method:
@Transactional(readOnly=true)
public User loginUser(String login, String password) {
 User user = userDao.findUserByLoginOrEmail(login);
 if(user != null ){
           //Call StandardStringDigester.matches to compare stored digest and provided password
  if(digester.matches(password, user.getPassword())){
   return user;
  }
 }
 return null;
}
And that's it, now you are sure that your passwords are stored in a safe way.

Wednesday, July 10, 2013

JSF2, Spring and Hibernate/JPA integration

In a previous article we saw how to integrate Spring with JSF2  and how to define custom JSF2 scopes in Spring. In this part, we will add support of JPA (through Hibernate) to our application.
As you should know Hibernate is an open source Java persistence framework that implements JPA.  If you are not familiar with Hibernate and JPA please refer to documentation for more informations.
In this article , we will create a simple data model consisting of two tables: CV and USER_TABLE. For simplicity user_table will refer to cv table via a foreign key.
Before we start, please add following dependencies to your POM file:


 org.hibernate
 hibernate-core
 4.3.0.Beta2


 org.hibernate
 hibernate-entitymanager
 4.3.0.Beta2


 antlr
 antlr
 20030911

1) Tables creation

Notice that I am using MySQL here.
Table CV
CREATE TABLE `cv` (
 `cv_id` BIGINT(20) NOT NULL AUTO_INCREMENT,
 `objective` TEXT NULL,
 `content_url` VARCHAR(255) NULL DEFAULT NULL,
 `title` VARCHAR(255) NOT NULL,
 `document_name` VARCHAR(255) NOT NULL,
 PRIMARY KEY (`cv_id`)
)
ENGINE=InnoDB;
Table USER_TABLE
CREATE TABLE `user_table` (
 `user_id` BIGINT(20) NOT NULL AUTO_INCREMENT,
 `firstname` VARCHAR(50) NULL DEFAULT NULL,
 `lastname` VARCHAR(50) NULL DEFAULT NULL,
 `email` VARCHAR(255) NULL DEFAULT NULL,
 `login` VARCHAR(30) NOT NULL,
 `password` VARCHAR(30) NOT NULL,
 `address` VARCHAR(100) NULL DEFAULT NULL,
 `role` VARCHAR(30) NULL DEFAULT 'USER',
 `cv_id` BIGINT(20) NULL DEFAULT NULL,
 PRIMARY KEY (`user_id`),
 INDEX `FK_20732bf2152840f1b10160c7a1f` (`cv_id`),
 CONSTRAINT `FK_20732bf2152840f1b10160c7a1f` FOREIGN KEY (`cv_id`) REFERENCES `cv` (`cv_id`)
)
ENGINE=InnoDB;

2) Domain classes

After creating tables, we should create corresponding classes to be mapped via JPA:


package com.raissi.domain;

import java.io.Serializable;

import javax.persistence.Column;
import javax.persistence.Entity;
import javax.persistence.GeneratedValue;
import javax.persistence.GenerationType;
import javax.persistence.Id;
import javax.persistence.Table;

@Entity
@Table(name="cv")
public class Resume implements Serializable{
 private static final long serialVersionUID = -6450539497238528693L;
 
 @Id
    @GeneratedValue(strategy = GenerationType.IDENTITY)
    @Column(name = "cv_id")
 private Long id;
 @Column(name = "title")
 private String title;
 @Column(name = "objective", nullable = false)
 private String description;
 @Column(name = "content_url", nullable = false)
 private String contentUrl;
 @Column(name = "document_name", nullable = false)
 private String documentName;
 
 public Resume() {
  super();
 }
        //Getters and setters...
}
package com.raissi.domain;

import java.io.Serializable;
import java.util.Set;

import javax.persistence.CascadeType;
import javax.persistence.Column;
import javax.persistence.Entity;
import javax.persistence.GeneratedValue;
import javax.persistence.GenerationType;
import javax.persistence.Id;
import javax.persistence.JoinColumn;
import javax.persistence.ManyToOne;
import javax.persistence.Table;
import javax.persistence.Transient;

import com.raissi.domain.Resume;

@Entity
@Table(name="user_table")
public class User implements Serializable{

    private static final long serialVersionUID = 3571343460175211199L;
 
    @Id
    @GeneratedValue(strategy = GenerationType.IDENTITY) //Generator user_seq
    @Column(name = "user_id")
    private Long userId;
    @Column(name = "login", nullable = false)
    private String login;
    @Column(name = "password", nullable = false)
    private String password;
    @Column(name = "firstname", nullable = false)
    private String firstName;
    @Column(name = "lastname", nullable = false)
    private String lastName;
    @Column(name = "address")
    private String address;
    @Column(name = "email", nullable = false)
    private String email;
    @Column(name = "role", nullable = false)
    private String role = "USER";
 
    @ManyToOne( cascade = {CascadeType.MERGE})
    @JoinColumn(name="cv_id")
    private Resume resume;
 
    public User() {
 super();
    }
 
    //Getters and setters here...
}
Now that we have our our tables and corresponding tables in place, let's create a Data Access Objects layer.

3) DAO layer

In this layer, I will use for each persistent object, a DAO interface and an implementation for the it. This is the recommended way, especially when working with IoC design pattern. 
package com.raissi.dao;

public interface BaseDao {
    public void save(Object o);
    public void update(Object o);
    public void delete(Object o);
}
package com.raissi.dao;

import javax.persistence.EntityManager;
import javax.persistence.PersistenceContext;

import org.springframework.stereotype.Component;
import org.springframework.stereotype.Repository;

@Repository
public class BaseDaoImpl implements BaseDao{
 
    protected EntityManager entityManager;

    @Override
    public void save(Object o) {
 entityManager.persist(o);
    }

    @Override
    public void update(Object o) {
        entityManager.merge(o);
    }

    @Override
    public void delete(Object o) {
 entityManager.remove(o);
    }
 
    @PersistenceContext
    void setEntityManager(EntityManager entityManager) {
        this.entityManager = entityManager;
    }
}
Here we defined a base CRUD operations class. It will be inherited by all other DAO classes.
package com.raissi.dao;

import com.raissi.domain.Resume;

public interface ResumeDao extends BaseDao{
 public Resume getResumeByUser(Long userId);
}
package com.raissi.dao;

import javax.inject.Named;
import javax.persistence.NoResultException;
import javax.persistence.Query;

import com.raissi.domain.Resume;

@Named("resumeDao")
public class ResumeDaoImpl  extends BaseDaoImpl implements ResumeDao{

 @Override
 public Resume getResumeByUser(Long userId) {
  try {
  Query query = entityManager
  .createQuery("from Resume res where res.id = " +
    "(select user.resume.id from User user where user.userId = :userId)").setParameter("userId", userId);
  return (Resume) query.getSingleResult();
  }catch (NoResultException ex) {
   return null;
  }
 }
}
package com.raissi.dao;

import java.util.List;
import com.raissi.domain.User;

public interface UserDao extends BaseDao{
 public User findUserByLoginOrEmail(String loginOrEmail);
}
package com.raissi.dao;

import java.util.List;

import javax.inject.Named;
import javax.persistence.NoResultException;
import javax.persistence.Query;

import com.raissi.domain.User;

@Named("userDao")
public class UserDaoImpl extends BaseDaoImpl implements UserDao{
@Override
 public User findUserByLoginOrEmail(String loginOrEmail) {
  try {
   Query query = entityManager
     .createQuery("from User user where user.login=:login or user.email=:email")
     .setParameter("login", loginOrEmail).setParameter("email", loginOrEmail);
   return (User) query.getSingleResult();
  } catch (NoResultException ex) {
   return null;
  }
 }
}
Now that we have our DAO layer prepared (notice the entityManager injected in the BaseDaoImpl class), we need to inform Hibernate where to find our tables.

3) JPA configuration with Spring

If you followed my last article about Spring Security, you would have seen that we configured a datasource via Spring:


The last defined bean: entityManagerFactory is a factory that will build and return the entityManager we injected in our DAO classes via @PersistenceContext annotation.
Now you may notice that we are referring to a "cvtheque" value as a "persistenceUnitName" in the entityManagerFactory bean. In JPA, you must have a a file named "persistence.xml" under a folder named META-INF in you classpath (I created the folder META-INF under src/main/resources). This file must define the persistence unit:


In this persistence config, you may pass Hibernate parameters like show_sql. By now you should be able to use your DAO layer and communicate with you DB tables.

4) Transactions

Now, if you want to save a new User object into your database using this code in a DAO class, let's say a generic class responsible for basic CRUD operations of all objects:

public void save(Object o) {
     entityManager.persist(o);
}
And in service class, UserServiceImpl you call this method:
public void saveUser(User user){
 userDao.save(user);
}
Then when calling the method UserService#saveUser from a managed bean, you may notice that everything works fine, except one thing, data is not persisted into DB (user not saved). Well this is pretty normal. We don't have any transaction opened to commit data into DB. In fact, "No communication with the database can occur outside of a database transaction" (read more here). So what to do ?
Well, you need to open transaction before every data change aimed to be done on DB, do logic and then commit transaction.
Without Spring: if you are not using Spring (especially, Spring Transactions) or another Transaction management framework, then you have to manage your transactions manually, like this in your previously mentioned BaseDAO class:

public void save(Object o) {
 EntityTransaction tx = null;
 try {
     tx = entityManager.getTransaction();
     tx.begin();
     entityManager.persist(o);
     tx.commit();
 }
 catch (RuntimeException e) {
     if ( tx != null && tx.isActive() ) tx.rollback();
     throw e; // or display error message
 }
 finally {
  entityManager.close();
 }
}
As you can see this is a very much code to write just to call the entityManager.persist(o); instruction. Hopefully, Spring come with a framework to manage transactions for us using AOP annotations.
With Spring Transactions: to make a method transactional (i.e. be executed in a transaction), all we need is annotate that method with @Transactional.
Usually, you will want to make your service layer transactional. In fact, a transaction must go inline with the ACID properties (Atomic, Consistent, Isolated, Durable). And by this, if a service layer method,only requires a one call to the DB, than the transaction will contain only that DB access. However, if a single service method needs to execute two or more related operations, and among them there is a DB save operation. If you made only DB access method as transactional, then, when an error occurs while doing the service logic (or during the DB transaction) then only some logic will get executed. A good example for this situation is this service method:

public void bookArticle(User user, Article article, int quantity){
 articleDao.retrieveFromStock(article, quantity); //decrease the number of articles available in DB
 doPayment(user, quantity, article);//Make the payment
}
Now suppose that for a reason or another, the doPayment method throws an exception. If you didn't think about that, then you will get your DB messed up every time there is a payment problem. And you will find yourself obliged to handle these error by re-adding back the already decreased number of articles into DB.
And for this reason, you should make every service logic that is related by the ACID properties in the same transaction, like the above bookArticle method.
How to do it in Spring words
First thing to do is to add the transaction Spring framework, here is maven dependencies:


  org.springframework
  spring-tx
  ${org.springframework.version}

After that, you need to add Spring transactions configs to your applicationContext.xml file, here what needs to be added (I chose to write the beans root element here, just to show you the added namespace for transactions):


Now all you need is to annotate you methods with adequate transaction annotations, for example:
@Transactional(propagation=Propagation.REQUIRES_NEW)
public void saveUser(User user){
 userDao.save(user);
}
@Transactional(readOnly=true)
public User findUserByLoginOrEmail(String loginOrEmail) {
 return userDao.findUserByLoginOrEmail(loginOrEmail);
}
Here we have two types of annotations: a method that requires a new transaction to be opened (via propagation=Propagation.REQUIRES_NEW) and another one, that is only for reading DB data (via readOnly=true).
For a complete list of Spring transactions propagation behaviors please read this section of the docs.

Monday, July 8, 2013

JSF 2, Spring Security integration with Remember-Me (Contd.)

In last part, we said that we are going to use a database to store Remember-Me cookie's related data. This data consists of the username used to login, a series identifier and a token and a timestamp to maintain the last login to the app. For more details about the principles behind stored data, please refer to this article. Fortunately, for us, Spring Security will handle this stuff. We just need to give him the right configs.

1) Configuring database

First thing to do, is to prepare our database. In this series, I will be using MySQL as a DB. 
So let's create our table to store mentioned data:
create table persistent_logins (username varchar(64) not null,
      series varchar(64) primary key,
      token varchar(64) not null,
      last_used timestamp not null)
Next, we configure a datasource to be used, not only by Spring Security, but also by future persistence frameworks (Hibernate, Spring Data etc...). In applicationContext.xml add following:


First line, is just telling Spring about a properties file contained in classpath of our application and named "application.properties". This file, will contain config params that will help system administrators to deploy our application without any need to recompile whole application when a server password is changed:
db.driverClass=com.mysql.jdbc.Driver
db.url=jdbc:mysql://localhost:3306/db_name_here
db.username=dbUserName
db.password=dbUserPassword
db.showSql=true

In next lines, we are just defining a Spring bean that will be our used JDBC datasource implementation. We need to pass it params like db url, username, driver class etc... Don't forget to add dependencies of your DB driver in POM file, for MySQL, just add following:


        mysql
 mysql-connector-java
 5.1.6

2) Remember-Me stuff

In previous part, we added a remember-me element to http config element. That will tell Spring Security to try to fetch user from our system whenever his browser send a valid cookie value.
Now we need to update that remember-me element so it references a new defined Spring bean:


The remember-me services bean must define an implementation of a remember-me strategy. Here I am going to use one of the two implementations Spring Security offers. For the PersistentTokenBasedRememberMeServices to work, we must give it: a tokenRepository which is a bean we will define and that will store tokens in previously created table, a userDetailsService (and we already defined one in previous part), a key that will be used to encrypt/decrypt sent cookie to client browser.  The two other properties are optional. And their names are just meaningful.
Now we define the tokenRepository bean:


We just give it the name of already configured datasource. The other property is just to prevent it to drop/create the table on each server start.

We need also to define an authentication provider related to the Remember-Me concept and register it:


And we need to register it in the authentication-manager already defined, here is the entire declaration:


And the last config we need is to define a Remember-Me filter that should intercept HTTP requests and validate cookies whenever needed:


Notice how we gave it references to our defined rememberMeServices and authenticationManager.

3) JSF 2 Remember-Me part

Now that everything is configured as expected, let's implement the JSF part of the app that should tell Spring Security when to remember a user, and when not.
First thing to do, is to inject the rememberMeServices service in the UserManagedBean managed bean:
@Inject
@Named("rememberMeServices")
private RememberMeServices rememberMeServices;
Next, in the login method in UserManagedBean class, we just add the following code:

HttpServletRequest request = (HttpServletRequest) FacesContext.getCurrentInstance().getExternalContext().getRequest();  
HttpServletResponse response = (HttpServletResponse) FacesContext.getCurrentInstance().getExternalContext().getResponse();
HttpServletRequestWrapper wrapper = new HttpServletRequestWrapper(request) {
    @Override 
    public String getParameter(String name) { return "true"; }            
};  
rememberMeServices.loginSuccess(wrapper, response, authentication);
So what does this code do ? From the Spring Security docs, the RememberMeServices#loginSuccess method must be called "whenever an interactive authentication attempt is successful". And since we are doing login manually, then, we should invoke it manually. As for its role, this class "examines the incoming request and checks for the presence of the configured "remember me" parameter. If it's present, or if alwaysRemember is set to true, calls onLoginSucces". The onLoginSucces method by itself is responsible for creating a new persistent login token with a new series number. Then it stores the data in the persistent token repository and adds the corresponding cookie to the response. The loginSuccess method must be given a HttpServletRequest to check if a remember-me param is present and if it's equal to "true", if not it will just return. Second param is a HttpServletResponse, in which generated cookie is written, and finally a org.springframework.security.core.Authentication that will contain username of loggedin user. Now it should be clear why I overrided the getParameter method in the HttpServletRequestWrapper passed to loginSuccess. The added code by now, will activate the Remember-Me whenver called. This should not be the case, since not all users will wish their connections be maintained (they may connect from a public PC for example). This been said, we need to test if connecting user wants to be remembered:
//In user managed bean (where login method is defined)
private Boolean rememberMe = false;
and in the login page, we add a checkbox to let user decide:


Now we just test on the rememberMe value to decide whether to call RememberMeServices#loginSuccess or not. Et voilà!! We just finished with the Remember-Me feature in JSF 2 with Spring Security.
You can test your code by setting a session timeout value of 5 minutes for example, login to the application and wait for session to timeout and then re-call home page, you should access it without being obliged to re-login.

4) Instantiate JSF Managed beans

Now suppose, that with normal login, if user is successfully authenticated, you have a session managed bean that will handle some informations to be used by other managed beans in the application. You may say that we already have the logged in user's username in Spring Security' SecurityContextHolder. That's true, but also, the stored object has a few data, and you will soon be obliged to fetch more data for the User object from DB. That will result in extra DB access. 
So let's assume you have a managed bean like this: 
package com.raissi.managedbeans;

import java.io.Serializable;
import javax.inject.Named;
import org.springframework.context.annotation.Scope;
import com.raissi.model.User;

@Named("loggedInUser")
@Scope("session")
public class LoggedInUser implements Serializable{
 private static final long serialVersionUID = -1033377115353626379L;
 private User user;

 public User getUser() {
  return user;
 }

 public void setUser(User user) {
  this.user = user;
 }
}


We inject this bean in the UserManagedBean (view managed bean responsible for the login/logout process), and whenever a successful login takes place, we set user in LoggedInUser with the returned object from DB. And in all managed beans that need informations about user logged to the app, we just inject this managed bean.
Now if you try to access the application after session timeout, Spring Security will create a new session for you and authenticate you automatically. But in this newly created session, you won't have JSF session managed bean LoggedInUser. And if you try to access its User variable in a homeManagedBean, you will have a NullPointerException.
To initialize this bean, in early defined CustomUserDetailsService add the following code after setting authentication in SecurityContextHolder:

HttpServletRequest request = ((ServletRequestAttributes) RequestContextHolder.getRequestAttributes()).getRequest();
LoggedInUser loggedInUser = (LoggedInUser)request.getSession().getAttribute("loggedInUser");
 if(loggedInUser == null){
         loggedInUser = new LoggedInUser();
  request.getSession().setAttribute("loggedInUser", loggedInUser);
 }
 if(loggedInUser.getUser() == null){
  loggedInUser.setUser(user);
 }
Thanks to Arjin comment below, this code will only work if the LoggedInUser objects are simple POJOs with no injected beans. But when we want to use other services inside it (as for example: injecting the RememberMeServices bean to centralize the updating process of SecurityContext, which I did indeed) then, things will go bad and complicated. And all of that if because of LoggedInUser object being manually instantiated.
The solution I opted for in this situation is to inject a scoped proxy of LoggedInUser inside CustomUserDetailsService. You would say, "but CustomUserDetailsService is a singleton service that will be created only once a time, however LoggedInUser is a session scoped bean, that will be created on every new session". And that's why I am using a scoped proxy of LoggedInUser. By that we will be "injecting a proxy object that exposes the same public interface as the scoped object but that can also retrieve the real, target object from the relevant scope" (more details here). So how to do it ?
First let's create an interface that LoggedInUser will implement:
package com.raissi.managedbeans;

import java.io.Serializable;

import javax.servlet.http.HttpServletRequest;
import javax.servlet.http.HttpServletResponse;

import com.raissi.domain.User;

public interface ILoggedInUser extends Serializable{

 public User getUser();
 public void setUser(User user);
 /**
  * Update security context
  * This method should be called whenever setUser is called.
  * It's defined here to be conform with the DRY principle.
  * @param request
  * @param response
  */
 public void updateSecurityContext(HttpServletRequest request, HttpServletResponse response);
}

After that let's change our LoggedInUser class:
package com.raissi.managedbeans;

import java.util.ArrayList;
import java.util.List;

import javax.annotation.PostConstruct;
import javax.inject.Inject;
import javax.inject.Named;
import javax.servlet.http.HttpServletRequest;
import javax.servlet.http.HttpServletRequestWrapper;
import javax.servlet.http.HttpServletResponse;

import org.springframework.context.annotation.Scope;
import org.springframework.context.annotation.ScopedProxyMode;
import org.springframework.security.authentication.UsernamePasswordAuthenticationToken;
import org.springframework.security.core.Authentication;
import org.springframework.security.core.context.SecurityContextHolder;
import org.springframework.security.web.authentication.RememberMeServices;
import org.springframework.stereotype.Component;

import com.raissi.domain.User;
import com.raissi.security.Authority;
import com.raissi.security.CustomUserDetails;
import com.raissi.util.UserRole;

@Component("loggedInUser")
@Scope(value = "session", proxyMode = ScopedProxyMode.INTERFACES)
public class LoggedInUser  implements ILoggedInUser{
 private static final long serialVersionUID = -1033377115353626379L;
 
 @Inject
 @Named("rememberMeServices")
 private RememberMeServices rememberMeServices;
 
 private User user;

 public User getUser() {
  return user;
 }
 @PostConstruct
 public void init(){
 }
 public void setUser(User user) {
  this.user = user;
 }
 
 
 public void updateSecurityContext(HttpServletRequest request, HttpServletResponse response){
  List auths = new ArrayList();
  if(user.hasRole(UserRole.ADMIN.toString())){
   auths.add(new Authority("ROLE_ADMIN")); //Role here, like "admin"
   auths.add(new Authority("ROLE_USER"));
  }else {
   auths.add(new Authority(user.getRole())); //Role here, like "admin"
  }
  
  Authentication authentication =  new UsernamePasswordAuthenticationToken(new CustomUserDetails(user), null, auths);
  SecurityContextHolder.getContext().setAuthentication(authentication);
  
  HttpServletRequestWrapper wrapper = new HttpServletRequestWrapper(request) {
      @Override public String getParameter(String name) { return "true"; }            
  };
  rememberMeServices.loginSuccess(wrapper, response, authentication);
 }

}
Two things are to be noticed here:
a) we are using "proxyMode = ScopedProxyMode.INTERFACES" to tell Spring that we are exposing this bean as a proxy
b) we moved the logic to set authentication in Spring Security context from view managed beans (ex: in UserManagedBean) into the LoggedInUser.
This been done, you just update managed beans containing references to LoggedInUser to reference the new defined ILoggedInUser instead, example in UserManagedBean:
@Inject
private @Named("loggedInUser") ILoggedInUser loggedInUser;
And in login method:
//Get User object based on provided login and password:
User user = userService.loginUser(userLogin, password);
//Set user in LoggedInUser
loggedInUser.setUser(user);
//Update Security context:
HttpServletRequest request = (HttpServletRequest) FacesContext.getCurrentInstance().getExternalContext().getRequest();
HttpServletResponse response = (HttpServletResponse) FacesContext.getCurrentInstance().getExternalContext().getResponse();
loggedInUser.updateSecurityContext(request, response);

By now everything should work fine, and you completely have Spring Security working with your JSF 2 application and also with the Remember-Me feature activated